Sunday, May 15, 2011

The Kitchen Closes at 8:00

Well, friends, all good parties have an end and this one's no different.  It's been over a year now that we've been sharing our adventures in the kitchen and it's been a lot of fun.  The kid-chefs have grown a few inches and learned a few things as have I.  It's humbling to set out on an adventure.  You don't really know what to expect, and you don't know what will happen, but you hope that at the end of the day it will have been worth it.  This one was.

We're not going to stop cooking, but for now, we are going back to the family kitchen and we'll keep feeding each other, spending time together, and trying out a few new things.  There's a beef tongue in the freezer (both kids said they're game!) and we have a pile of ideas to try out.  Summer's coming up and there will be travel, family and eventually, a new routine in August.

We spend a lot of time apart in the summer while the grandparents get their chances to pass along what they know and to grow new interests and memories with their grand kids.  They already have a fondness for home-made ravioli, snicker doodles, campfire dinners and raspberry jelly, each associated with a different grandparent.  This summer, they'll stash some more away in those troves, as will I.

I hope you've enjoyed reading this blog.  Maybe you've tried a recipe or thought "I could do better!"  I hope so.

One last swipe with the sponge, toss the towel in the laundry, lights out for tonight.

Talia's Crew

Mother's Day dinner - by Jack and Talia

Strawberry Syrup for the rest of the year

Wednesday, May 4, 2011

Iron Chef Results - Citrus, Asparagus, Strawberry winners!

The date was set, the contestants were lined up and the three challenging ingredients were selected.  The Iron Chef dinner party was on!


If you haven't already watched an episode of Iron Chef (in English or Japanese) the premise is pretty simple - the guest chefs compete to create the best menu using three ingredients in each course.  The judges taste, review and select a winner.  For our at-home dinner party version, we assigned courses to the guests, told them what the three ingredients were, and although we were prepared to put the kitchen at every one's disposal when they arrived, all the dishes arrived potluck.

We started with six contestants.

Three days before the party, one withdrew due to illness.

The morning of, we lost another, contestant.  The ranks were already closing, the tension mounting as the remaining contestants began to see their odds of coming out on top increase.

During the day, the dessert preparations were under way.  Have you ever tried to concoct a dessert with asparagus?  Even the Internet was no help here...turning up only balsamic glazes in the "sweet" category.  We were on our own and the clock was ticking.

We began to experiment.


Asparagus Sugar.  This had to be one of the weirdest flavors I've ever tasted.  How to describe the pungent, strange, not-sweet-not-vegetable smell of this mix?


Caramel with bits of asparagus - good, but mostly because you can't actually taste the asparagus.  Bad part?  Cleaning up the pan.  (you have to add lots of water and boil the caramel off - good to know!)


Candied asparagus tips.  These were surprisingly good.  Pulled out just when the sugar hit a thick enough stage to coat the tips and harden, they were oddly sweet and savory.  We used a salted caramel, which helped join the flavors.


After going through a tasting station, including some strawberries that were sprinkled with asparagus sugar and a few others soaked in lemoncello and asparagus sugar, we settled on our dessert entry:


A cornmeal crust, a lemon-mascarpone base topped with strawberries marinated in lemoncello and asparagus sugar.  We garnished each slice with a candied asparagus tip just before serving, but they softened after being made and were "sticky and weird" in the words of our judge.  However, the rest of the dessert was delightful.  (This probably cost us the winning spot, but such is the cost of experimentation!)

The other contestants arrived, wine was served on the porch and our judge, the wise, youngest participant, was selected.

Other dishes included:


A platter of puff-pastry shells with a bright lemon-cream sauce enrobing tender pieces of asparagus and chicken, topped with diced strawberries.  Incredibly tasty.


A simple side of blanched asparagus, julienned strawberries and lemon zest, a perfectly simple combination of the three ingredients.


Salt and lime brined chicken breasts, grille, topped with a white wine and strawberry sauce seasoned with thyme and asparagus, and


An asparagus break with lime-cream and strawberries.  The asparagus bread tasted strangely of peanut butter - some strange kitchen chemistry was at work in this last dish.

Our judge dutifully tasted everything and...


After carefully weighing the dishes (and his hosts feelings, his mother's feelings and those of the other contestants) declared "it was all good so I can't choose a winner!!"

In the face of such diplomacy, we had only one choice.  We agreed!  It was a delicious dinner and as the contestants packed up their platters and wandered off into the spring-scented night, we were already imagining the next trio of secret ingredients.

Thursday, April 28, 2011

Iron Chef - Coming Soon!

We're going to participate in an iron-chef style dinner this weekend - the three secret ingredients are asparagus, citrus and strawberries.

Does anyone have a candied asparagus recipe?

We'll let you know how it goes!

Saturday, April 9, 2011

Next-Door Eggs

"I do, I like them, Sam-I-Am!"

Remember that line?  We do, and we like them too.  Green eggs, I mean.


Our neighbor has the most adorable flock of four hens, all well-loved by her two boys, and all very tame.  They're pretty, they're fun, and they're very productive!

Her Ameraucauna lays the greenish eggs and they're lovely next to the speckled ones.  Sadly, they're not green on the inside!  If you haven't had a really fresh fried egg recently, we'd suggest find some local chickens and try them out.  A warning: once you've had them, it's hard to go back to runny grocery-store eggs!  Next thing you know you'll be contemplating a coop of your own.

If you're lucky, you'll turn up a neighbor who will let you hen-sit when they're out of town!

Friday, April 8, 2011

Low-Country Boil


Who wouldn't love a meal with no dishes afterward?  Or silverware?  We spread newspaper, strained the boil and dumped the boil on the table: shrimp, corn on the cob, red potatoes and andouille sausage.  Seasoned with the traditional boil packet from the grocery store and voila: casual dining.

Bring a large pot of water to a boil. 
Add 15-20 small potatoes (red) and cook for 10 minutes
Add the shrimp boil seasoning
Add 4 andouille sausages cut into 1/2 inch disks and 8 corn cobs (small, frozen) and cook another 3-5 minutes until the corn starts to get tender. 
Last, add 1.5 lb medium shrimp (about 30 shrimp) and cook for just 1 minute, until they're heated through and no longer translucent.

Drain and serve.  


Serves 4.

Wednesday, April 6, 2011

Cardamom - Rosemary - Chipolte Roast Chicken

This was either going to be great, or a total waste of a chicken.

I love a simple salt and pepper roasted chicken, but it's been grey and rainy out lately and I felt the need to spice things up a little bit.  There wasn't going to be a tango class on a Wednesday, and no friends were lined up at the door, so we spiced up the chicken instead.

With it's powerful, musky-sweet-exotic flavor, a little Cardamom goes a long way.  It's found in chai tea, Christmas cookies, Scandinavian dishes and middle-eastern cooking and I've always liked the savory-sweet combinations it stands up to, so we decided to try a few out on the chicken.

We rubbed equal amounts (about a 1/4 teaspoon) of cardamom and chipolte powder on the chicken, followed by salt and pepper.  Then we stuck a stalk of rosemary in the chicken's cavity (about 4 inches long) and stuck it in the oven.


After about an hour, it had reached 160* and smelled fantastic.  (4 lb chicken)


It's not often we get to serve up a yellow main course, is it?  Complemented by my Grandmother's knife and fork serving set - bakelite still has it's place at our table!  I'm curious now about what other typically sweet spices could be combined with savory or spicy to make interesting combinations or other ways to use cardamom.  Anyone have any ideas or recipes to share?

Monday, April 4, 2011

Oatmeal with Milk

Technically, it's not cooking, but we're not that picky, right?

Oatmeal, covered with milk (and a sprinkle of sugar, if you like).  Let it stand for 5 minutes and voila: a snack.


It's just like those parfaits at the airport or fast-food places, minus all the ick.  Turns out there's more to oatmeal than we thought

Thursday, March 31, 2011

Garlicky Crumb-Coated Broccoli (French Fridays with Dorie)

I'm going to admit it up front.  I don't really like broccoli.  In fact, I remember including this fact in a letter to our first president Bush - my best friend and I were lacking on world policy specifics to discuss with him, but we'd heard he didn't care for the green veggie much either.  It's one of those things any decent adult is supposed to like, right?  Sunshine, ironic political comments, doing your taxes early, getting regular exercise and.....broccoli.  They're good for you, a sign of sophistication, satisfying and wholesome.  So now you know, I'll eat it, but you can't make me like it.

Apparently though, this is a recessive gene and everyone else likes it in my house.  So, we made the Garlicky Crumb-Coated Broccoli and you know what?  I still wasn't crazy about it.  (you thought I was going to say I liked it after all, didn't you??)


But it was okay.  And the kids loved it, so it's a keeper. 

The recipe in Around My French Table says to steam the broccoli first, then toss it with butter, garlic, breadcrumbs, salt and pepper.  Our first alternation was to microwave the broccoli, instead of steaming it.  I don't get it - if you have access to a microwave, I say go for it!  There's no waiting for water to boil (and we all know how long that can take!) - no steamer basket to clean, plus pot and pan., and the nutrient loss is less than steaming.

So we microwaved.

The second alteration was the butter.  I simply cannot bring myself to use 1/2 stick of butter for two stalks of broccoli.  French women might not get fat, but I sure can!  So I used a pat of butter (less than a TB) and olive oil. 


Mixing oil and butter is a tried and true french approach to cooking (and Italian, for that matter) - it stretches the butter flavor without stretching your pants, and it raises the smoke point of the butter - so it doesn't burn as easily.  No brainer.

Once the butter/oil mixture was warmed, we added minced garlic, breadcrumbs and seasoning (including lemon zest), toasted the bread crumbs and added the broccoli. 

It looked great and, as I said, everyone else thought it was fantastique!

Monkey Gets the Beets

My daughter was insistent on peeling the beets.  A little too insistent...and that's when I realized she didn't have a burning desire to spend quality time with her mother in the kitchen - she wanted to use her monkey peeler!


Oh yes, this is one of those "just for kids!" items you see tucked onto the ends of the aisles in kitchen stores, where they keep all those cute impulse buys.  Egg separator?  Pot holder that looks like a cow?  Kid tools?  That's where you'll find them!

The thing about this peeler though, is that it works.  It's easier for her to hold than the usual ones, and she loves it, even after the Ouch! episode.  She peeled those beets in no time, holding them close against her shirt.  One of those "maybe you'd better get your apron (because I want this to be fun, not an occasion for me to fret over the cost of replacing your beet-gold wardrobe!!)"  Smile.

We roasted them in the oven with the chicken, taking about 20 minutes for 3 large beets in 1/2 inch chunks.


I believe I'm overcoming my aversion to beets, and enjoying the fact that everyone else seems to gobble them up.  The sweet, simple beets were a delicious counterpoint to the spicy chicken (coming soon!) that we ate alongside it.

Roasted Golden Beets

3 yellow beets, tops removed, peeled and chopped into 1/2 inch chunks
Toss with 2-4 TB olive oil, season lightly with kosher salt.
Line a baking dish with tinfoil for an easier clean-up and spread the beets on the foil.
Roast at 400* F for about 20 minutes until they begin to turn golden brown.

Stir once midway through the cooking.

The tender, mild flavor is a nice accompaniment to spicy foods, and they can stand in for a starchy side dish.

Monday, March 28, 2011

Simple Soup

Last week was a busy week.  There was a leftover pizza night and a soup and grilled cheese night, each preceeded by a 'what am I going to serve for dinner' moment.  It was one of those weeks.  The only bright spot was that I didn't run out of milk, but only because I'd bought way more than the sleep-over boys could drink.  (Because really, mom, why would they drink milk when you had cans of root-beer and ginger ale on hand?  sigh.  Yes, a better mother would have had only milk and sliced fruit to go with the pizza, but I was just winging it.)

There was one small, shining moment of decent eating in the middle of this work-life-unbalance.  Pasta soup.  This was winging it to the max - no recipe, no plan, just making the most of two frozen italian sausages, some slightly dehydrated carrots rattling around in the bottom of the crisper, dried pasta, boxed broth and some frozen duxelles. The sausages were sliced and browned, deglazed the pan and added the carrots and broth, brought to a boil, added duxelles and pasta and cooked for 8 minutes.  Done.


I put it on the table and, glad it wasn't pizza, dished it up.  Nothing fancy, but it was hot and satisfying.  It felt good, in the middle of all the chaos, to remember that sometimes simple is the better balance to busy.

No recipe tonight, since this was mostly about making a little bit of peace from the chaos.

Monday, March 21, 2011

Breakfast, anyone?

What do you serve a pack of 10-year-olds for breakfast after a sleepover?

Pancakes, Bacon and Sausage, of course!


Last week was an exceptionally busy week, with several tossed-together dinners and last-minute lunches - of course it was also the week that culminated with my son's first "big" sleepover party.  Making the cake was the hard part (more about that tomorrow!)  So breakfast had to be predicable.  And good.

I'd recently read a handy method for cooking up lots of bacon at once (I can't remember where, now).  You take a cooling rack (the kind with squares that looks like graph paper, not just rods in one direction) and put it on top of a rimmed baking sheet or jelly-roll pan.  Lay the bacon strips close together on top and bake in the oven at about 425 until they're browned on both sides - about 20 minutes in my oven.  I did notice two things - having the baking sheet lined with foil is a good idea and the back of my oven heats much faster than the front!  (Turn the sheet, if you're willing to brave the splatters!)

The sausage tossed up okay in a skillet and the pancakes were from a mix, with apples, cinnamon and diced apples (unpeeled).

This breakfast fueled some serious basketball, hide-and-go-seek and general rough-housing, so it must have been good!

CakeWalk

When I asked my son what kind of cake he wanted for his birthday, he said "vanilla.  with chocolate icing."  I should have stopped right there, but oh no...when it came up again, I couldn't help myself, "what about a chocolate and vanilla cake?" 

"Yeah!"  he liked that.

"And we could do it in an alternating pattern!"  (and yes, that's the sound of me, beginning to get carried away)

"Uh, okay." 
"And it could look like a checker board!"  (yes, officially carried away)

"YEAH!"  (he really likes this)

"Uh, okay.  okay!"  (that's me, realizing that I have managed to turn his simple request into a major saturday-filling task for myself.  I may never learn.  sigh.)

Saturday morning finds me in the kitchen, breaking out the chocolate, mixing up cake number one.  As I poured the batter into the pan, I thought to myself this is not going to release when it's baked.  Sure enough, it stuck to the pan in a major way.  So cake number one landed here:


Cakes number two (vanilla) and three (chocolate) were both baked in pans that were greased, lined with parchment and re-greased.  They released.

I didn't do a very good job trimming the tops or measuring the pieces (but I did a great job of keeping my panic in check as the hours flew by faster and faster....)  The structure was looking a little lop-sided, but some extra icing helped hold it together.  Luckily, both cakes were pretty structurally strong, somewhere between a layer cake and a pound cake, so they did hold their shape when stacked.  I once tried to make a "red barn" built-up cake using cake-mix cakes - might as well have been using marshmellows!  I think the candles got blown out before the roof came off that one!


Turned on it's side, iced and full of candles, it met the test of being a pretty tasty birthday cake.  For now, I've decided to postpone auditioning for any of those fancy-cake reality TV shows.


Wednesday, March 16, 2011

Fish Packets on the Grill

We had a good time making this dinner, the kids love eating anything that comes in their very own packet, and nothing's easier than packet-clean-up!

We set up the food processor and grated carrots and parsnips using the shredding disk.  Then we switched to the slicer for the zucchini and yellow squash (since they cook faster, they needed some extra heft!).

The veggies made a colorful bed for some fish filets (we used cod, but any firm fish would work), and we wrapped them in aluminum and parchment paper packets, folded over and well sealed on the top and sides.  The only seasonings were salt, pepper, olive oil (on the parchment paper and drizzled over the fish), and some thyme.

The packets sat directly on the grill over a medium heat for about 12 minutes.


The carrots and parsnips got sweet and everything stayed really moist and flavorful.  Salmon also works well this way.  With the food processor rinsed while we waited for the fish to cook, clean up was a snap.

The only real secret is to get the veggies sized so they'll cook as quickly as the fish - julienne, grated, thinly siced etc.  From there, it's all about experimentation with flavor combinations and seasonings. 

Saturday, March 12, 2011

Can you freeze leftover spaghetti?

The world is full of unanswered questions.  Why?  Why me?  Why do cats do that?  Will it burn?

The kitchen, microcosm of the world, is also full of unanswered questions, such as "can I freeze this?"

Not nearly as deep, but when you're worn out, staring at the kitchen and thinking "I really don't want to cook tonight," you're not after deep, you're after fast and easy.

I had this giant bag of frozen spaghetti and sauce from a week or two ago that I'd tossed in the freezer when it was apparent that I'd made way too much (it was a crock-pot recipe) and we weren't going to eat it before it spoiled.

I wasn't sure the spaghetti would hold up, but since there are lots of frozen noodle dishes in the instant-dinner aisle of the grocery store, I figured we'd give it a try.  What could we lose, right?

I had put the freezer bag in the fridge that morning.  Around 5:30, I turned the block of frozen leftovers into my pan. 


Needless to say, that would have taken a l...o...n...g... time to thaw.  So I pulled it out of the pan and put it in the microwave to defrost (we used the meat defrost setting).  About 9 minutes later, I put it back in the pan, brought everything to a simmer for a few minutes and served it with a salad.


It actually held up pretty well!  Of course, we were hungry, and the pasta had lost any claim to al dente but the sauce was good and the noodles were softer than usual, but not mushy.  We had used the multi-grain spaghetti, and I suspect that helped it hold up.

So, can you freeze leftover spaghetti?  Yes.

Wednesday, March 9, 2011

Orange-Strawberry Quiche

Have you ever had a dessert quiche?  I hadn't until Talia invented one.  We were talking about healthful options for her class project and she suggested this one - entirely her own invention.  I was pretty impressed with the creativity, and entirely unsure how we would go about making such a thing, but serendipity showed up and voila:


It's a pretty basic little quiche, with strawberries as the filling.  Just after she'd first suggested this combination, we were at the grocery store and saw a tart recipe with an orange custard filling.  Borrowing from that idea, we added orange zest to the cream, heated it a bit and added it to the filling.

The recipe, as with most first tries, is not yet ready for prime-time, but there was quite a deal of pride in preparing this dessert for her grandparents.  Confession?  I was not really sure this would be good.  But it was.  We'll probably try it again soon, with a slightly sweeter crust and see what comes of it.

Here's to invention: the necessary ingredient.


Tuesday, March 8, 2011

Ca-Zukes!

Hats off to Cohn's Crew - 22 second-graders and two fearless leaders who managed to put together four dozen ca-zukes as part of their nutrition unit!

First of all, those kids were much better behaved than I remember being in the second grade!  They measured flour and wheat germ as if their lives depended on getting exactly the right number of flakes in the scoop, and they were all about mixing, mixing, mixing, mixing.  Those were some of the best-mixed muffins ever! 

If you want me to run a meeting or do something work related for you, no problem.  But figuring out how to orchestrate this event so each kid would get some of the action without creating major chaos?  Well, that was a new challenge!  I'm happy to report that there were no significant disasters or oversights.  Except one, but we'll get to that.

We set up an ingredients station in the back and the kids carried up their bowls to read, measure, scoop and crack....


I lean slightly toward the over-compusive side when it comes to planning through something new like this, so we'd tested a batch at home, I'd figured out how many measuring cups and spoons of which size to have, stashed extra bowls and spoons in my bags and had sticky notes for the morning-of, so we wouldn't forget anything.  Of course, I forgot something.  Baking soda.  Not exactly an optional ingredient when it comes to baking, right?  So, supressing panic, I hurried down to the cafeteria.  The first lady said "no, we don't have any."  But she went to look while I tried to figure out if my mom could dash back to the house and grab mine before we got to that step....  But, lucky for us, the art of cooking at school lives on - I have never been happier to see a box of baking soda before! 

The kids measured and scooped, mostly neatly, but there was bound to be a little variety in the final products....and some flour in my wheat germ, but hey, that's just like home.  I had anticipated cracking the eggs into their bowls, to limit hand washing mid-recipe.  Can you tell me, what was I thinking??  They all wanted to crack their own eggs, of course.  Duh.  And I have never seen kids wash their hands so eagerly!


And with several adults around (thanks, mom and dad, for spending some of your vacation at school!), the kids mixed and scooped and got their gloppy muffin batter into the cups for baking.  We entrusted them to those wonderful cafeteria ladies,


Enjoyed some heated debate about whether something that contained such significant quantities of vegetables and 'eewwey' things like eggs and oil could possibly be good, but my daughter reported back that they turned out better than the test batch we'd made at home.  Must have been all that extra stirring!

The last question of the day was asked by one of the girls who looked up at me very seriously and said "but what IS a ca-zuke?"

Here's how you can find out:

Ca-Zukes! (Carrot-Zucchini Muffins)


3/4 cup all-purpose flour
1/2 cup whole wheat flour
2/3 cup dark brown sugar
2 tablespoons wheat germ
2 teaspoons ground cinnamon
1 teaspoon baking powder
1/2 teaspoon baking soda
1/2 teaspoon fine salt
2 large eggs
1/3 cup vegetable oil
1 tablespoon pure vanilla extract
4 medium carrots, grated (about 2 cups)
1/2 cup grated zucchini (about half a small zucchini)

Note: This recipe requires 12 muffin liners and a muffin tin (or 12 stand-along muffin cups)

Directions

Preheat the oven to 350* degrees F. Line twelve 1/2-cup muffin cups with paper muffin liners.

Peel and grate the carrots in a food processor. The zucchini can be grated with the peel on. Set the vegetables aside.

In a large mixing bowl, mix the flours, the brown sugar, wheat germ, cinnamon, baking powder, baking soda, and salt. In a medium bowl or large measuring cup, lightly mix the egg with a fork, then mix in the vegetable oil and vanilla extract.

Fold the wet ingredients into the dry ingredients with a rubber spatula or large spoon. Stir in the carrots and zucchini until everything is mixed. The batter will be very thick with lots of visible vegetables. Using a large tablespoon, scoop the batter into the muffin cups. Bake until golden and a toothpick inserted in the centers comes out clean, about 25 minutes. Turn muffins out of the tins and cool on a rack. Serve warm.

Makes 12 muffins.

Sunday, March 6, 2011

Wish us Luck!

Tomorrow, we're taking on a new challenge - 21 of them, actually!  Talia and I are going to don our aprons and attempt to bake Ca-Zukes! with her second grade class.

It should be interesting...we've been trying to find the right recipe and figure out how to give everyone a piece of the action without a) turning the classroom into a certified disaster zone or b) being asked to consider relocating to a new district!  Lucky for us, the grandparent tech-team is visiting and they've offered to photograph this event.

Check back tomorrow for photos (or not, if it proves to be an utter disaster!)

Here's to Sunday planning!

Saturday, February 26, 2011

Cauliflower Bake

We served up a pretty white dinner the other  night - chicken, onions and cauliflower.  Not the prettiest dinner, but it was mighty tasty.  We used a poulet rouge chicken - they're locally grown and although I was a skeptic at first, it was one of the tastiest chickens we've ever had.  The onions were roasted with the chicken so they had picked up a great caramelized flavor.  The cauliflower, however, was the main star of this particular evening's dinner. 


For a long time, I was a failure at making a white sauce.  For whatever reason, it seemed like an unattainable pinnacle of cooking.  The first break-through was making soufflee.  Following the recipe in Mastering the Art of French Cooking made it easy.  So when I saw a cauliflower in white sauce recipe on a cooking show, I figured we were ready to tackle this dish.

Equal parts flour and butter are the key, along with having your milk ready to go.  I heat the milk (1 cup) in the microwave, simple and quick.  Then it's ready to be stirred into the butter and flour (2 TB each) after they've cooked for a couple of minutes.  It thickened right up, see?


It cooked for a couple of minutes, then we turned off the heat, stirred in some grated swiss cheese, pepper, salt, nutmet and red pepper flakes, and poured it over our cauliflower.

The cauliflower had been microwaved ahead of time until it was mostly cooked.  Sauce and store-bought breadcrumbs topped the florets and we put it in the over for about 20 minutes, along with the chicken, to bubble up and brown.


As you can see, there were no leftovers on this one!

Wednesday, February 23, 2011

Curried Butternut Squash with Cous Cous

We're continuing to experiment with curried dishes around here - this one was a moderate success. 

(warning, what follows is a tangent!)  Has anyone else noticed that the grocery stores seem to have suddenly given up on butternut squash in the natural state?  It seems that all of a sudden, everyone's decided it's just too much work to peel one of those curvy cucurbita maxima (winter squash) so now you have to buy pre-peeled and pre-chunked squash in a plastic tub.  We are going to have to look harder!  For one thing, they're sometimes not as fresh, and for another, I hate throwing out one of those plastic containers when I could be composting the peel.  At least one store around here is selling the chunks from a bin, like they do for salad, so you're only left with the plastic bag to contend with.  But really, what was so terrible about the squash?  Of course, I'm all for convenient food, so the pre-chopped stuff is on my good list for weeknight dinners,  but I do resent not having the choice.  There are a few nights when I'd welcome the opportunity to chop open one of those luscious squashes and scoop the seeds out of it's fresh, sunshine-orange center.

Well, now that we're done with that rant, back to our curry.  We chopped our pre-chopped squash down to size and brought it to a simmer in chicken broth (veggie broth would work just as well).  After about 20 minutes, it was getting tender, and I added about 2 TB of red curry paste.  The squash cooked a little longer, and there was still a lot of stock in the pot.  I didn't have a starchy side, so, wanted to absorb the liquid, we added 1/4 cup cous cous and let it sit in the pot, lid on, heat off, for 5 minutes.


The resulting side was tasty, but a little too thick and gloppy for my taste.  Everyone ate it up, the kids loved the flavors, but next time, I think I will make the couscous on the side and serve the squash and liquid over it.

The flavors went really well together though, and I'm intrigued by some other possibilities - like a more traditional curry with roasted squash.  Now, if only I could find a whole squash!


Tuesday, February 22, 2011

Coconut Chicken Strips with Orange-Endive Salad

I have a terrible tendency to mess with recipes - it's a meddlesome quality that sometimes results in a good twist and sometimes....I learn why the recipe said to do such-and-such. 

With this chicken dish, we learned that there is such a thing as taking it too easy on the oil!  Lucky for us, the results were edible, just not golden.  You'll see what I mean in the photo below.

We started with some buttermilk - soaked the chicken strips (about 1 lb of chicken breasts, cut into thin strips) for about 30 minutes, then dredged them in a mix of 1 cup panko, 1 cup shredded coconut (unsweetened!) and 1 tsp of chili powder.

Now, we've already made some modifications to the original recipe I was inspired by, but here's where I went wrong: I didn't use enough oil in the pan.  The recipe said 3 TB of oil.  I thought I could get by with a large non-stick pan and some canola oil spray.   As the chicken strips cooked, the outer edges of the coconut got very cooked, nearly burning, but the panko crumbs didn't brown at all.  In an effort to lighten the dish, we ended up with some visually unappealing chicken.  When we used a little oil, they looked great.


For the next batch, I used 3 TB of oil in the pan and amazingly enough, they browned.  There are times when I get too impatient and try to cut corners.  Then there are times when I learn the hard way why certain formulas appear over and over in our cookbooks.  Putting some oil in the pan seems like a pretty basic one, hum?

At any rate, we served the chicken strips with some carrots (microwaved and seasoned with a little salt and pepper) and an orange-endive salad.  The endive was just chopped, raw, and tossed with lettuce and segments of a blood orange.  The dressing was a store-bought vinagrette and the contrast between the slightly sweet chicken and the tangy, citrus of the salad was excellent.

The kids love dredging and coating things for the stove top, and I love an experiment, so it was a successful dinner all in all.


Monday, February 21, 2011

Celery Root Salad

Do you ever look at some of the things we eat and wonder who on earth ever dug this thing out of the ground and decided to eat it??  Celery root is a case in point.  Would you eat this thing?


And yet, it's a really delicious thing to eat.  I was often served grated celery root in France as a side dish and never having seen one before, was mighty confused when I'd ask what it was and people would respond "celery".  Because I knew it wasn't any kind of celery we had back in Ohio.

It wasn't until several years later that I realized the French "celery" was "celery root" in english.   It's a hairy, ugly looking thing in its natural state, but actually pretty easy to deal with (don't be fooled by people who bemone the knife-crazy experiences they've had with these things.  A sharp knife is a good thing.).  You trim the rough outside off and chop it into pieces that'll fit into your foodprocessor tube.  Shred it and mix with some dressing.  That's it.  It's got the appearance of cole-slaw, but with a fresh, smooth flavor, seasoned to your taste, it's a great way to provide a light, healthful side to many meals.

Simple Celery Root Salad

Peel a celery root with a sharp knife, working your way around the outside.  Slice off any rough or dry parts. 
Chop the root into food-processor sized chunks and grate.
For dressing a softball-sized root, we used:
2 TB mayo
1 TB mustard
Juice from 1/2 a lemon (about 4-6 TB)
Salt and pepper to taste.

You could also use a vinagrette or other salad dressing in a pinch.


The lemon juice adds a nice tang to the dish.

Sunday, February 20, 2011

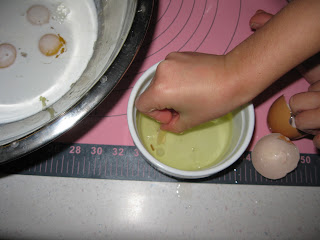
Egg Shell Tip

This tip comes from Talia, who taught it to me.  If you crack an egg, and a piece of shell goes into the egg, it's hard to get it out, right?  Chasing those bits around with your fingers is like trying to catch a cat when it's time to go to the vet's office.  Good luck.

Well, if you take a larger piece of shell, you can use it to scoop out the smaller pieces.  It really works.  I don't know why, but there must be a good reason somewhere in the food-science world.

What I do know is she read this in a storybook at school about Hanukkah and the people in the story were making Latkes.  A kid dropped a shell and the grandmother taught her the trick.  Then my daughter taught it to me.  Wish I'd read that book a long time ago....

Thursday, February 17, 2011

Pancetta with Greenbeans - French Friday

I love a simple side of veggies and this was a keeper.  The green beans were fresh at the grocery store (we're lucky to have early veggies here) and I got a 1/4 inch slice of pancetta from the deli counter, then we were ready to roll.

We ate this with shepherd's pie, so I felt like we needed a couple of veggies to round out the plates: boiled beets and pancetta green beans!


The beans were simple.  Boiled for a few minutes in salted water then rinsed in cold, to stop the cooking.  The diced pancetta was browned in a large pan, some fat removed and the beans were tossed back in.  Done.  The browned pancetta bits were crunchy and salty served over the beans.  Easy dishes like this are perfect for the kids to help with.  They were in charge of: 
  • snapping the ends off the beans
  • watching the pot boil
  • timing the various pots of water
  • chopping pancetta
  • stirring the pan
I confess that I was not ready to put them in charge of chopping the red beets.  At least, not until I figure out what removes beet juice from clothing!

You may remember my earlier delight in learning that both kids like roasted golden beets?  Well, I tried red beets, simply boiled, and they were not as big a hit.  I'll have to try red beets roasted next, to see if it's the roasting that makes all the difference!

For all three recipes, check out Around my French Table.


Wednesday, February 16, 2011

Chicken with Coconut Curry

This dish turned out to be a very simple one-pot dinner that required very little effort on our part.  The hardest part was peeling and chopping two carrots and cleaning and chopping some mushrooms.  Once that was done, we were pretty much on mix-and-cook mode.


Veggies prepped, we heated a couple of tablespoons of olive oil, browned four chicken thighs for about 6 minutes each side and poured off some of the oil (you can use a baster to just suck it out if you have a high-temperature baster, or you can just tip the pan over a jar, catching most of the oil - we didn't even remove the chicken!).  We added the veggies directly in with the chicken, tossed briefly then added a can of light coconut milk, a cup of chicken stock, two crushed cloves of garlic and two tablespoons of red curry paste.

I like the flavor of curry but didn't want this dish to be overpowering.  You could add more curry paste if that's to your family's liking.  We also tossed in a couple of stalks of chopped celery, but you could add water chestnuts or another veggies (chopped bell pepper or onion, for instance) depending on what you have on hand.

Once the liquids came to a boil, I turned the heat down to a simmer and let it cook about 25 minutes, until the chicken was tender and cooked through.


We served ours with a prepared mix of wild and brown rice (Uncle Ben's microwave mixes are really handy on a weeknight;although I find them to be a little too salty for everyday use, they are convenient).

This dish was everything you want in a homemade weeknight dinner.  Minimal prep, not too much time at the stove, and it cooks just long enough to set the table, wash up and oversee a few worksheets of fractions and spelling words.

Based on this first foray into homemade curry, I think we'll be coming back down this path!

Chicken with Coconut Curry
4 chicken thighs
1 (14 oz) can of light coconut milk
1 cup chicken broth
two large carrots, peeled and chopped into 1/2 inch pieces
8-10 mushrooms, cleaned and quartered (stems can be removed or left on)
2 stalks celery, optional, chopped into 1/2 inch pieces
2 cloves garlic, crushed
2 TB (or more to taste) red curry paste
Cooked rice or noodles, for serving.

Brown the thighs in 2 TB hot oil about 4-6 minutes each side.  Add chopped vegetables and garlic, toss for about 1 minute, until garlic is fragrant.  Add broth and coconut milk (shake the can well before opening).  Bring to a boil then reduce heat to simmer the chicken for about 25 minutes.

Serve over rice or noodles.