Saturday, February 26, 2011

Cauliflower Bake

We served up a pretty white dinner the other  night - chicken, onions and cauliflower.  Not the prettiest dinner, but it was mighty tasty.  We used a poulet rouge chicken - they're locally grown and although I was a skeptic at first, it was one of the tastiest chickens we've ever had.  The onions were roasted with the chicken so they had picked up a great caramelized flavor.  The cauliflower, however, was the main star of this particular evening's dinner. 


For a long time, I was a failure at making a white sauce.  For whatever reason, it seemed like an unattainable pinnacle of cooking.  The first break-through was making soufflee.  Following the recipe in Mastering the Art of French Cooking made it easy.  So when I saw a cauliflower in white sauce recipe on a cooking show, I figured we were ready to tackle this dish.

Equal parts flour and butter are the key, along with having your milk ready to go.  I heat the milk (1 cup) in the microwave, simple and quick.  Then it's ready to be stirred into the butter and flour (2 TB each) after they've cooked for a couple of minutes.  It thickened right up, see?


It cooked for a couple of minutes, then we turned off the heat, stirred in some grated swiss cheese, pepper, salt, nutmet and red pepper flakes, and poured it over our cauliflower.

The cauliflower had been microwaved ahead of time until it was mostly cooked.  Sauce and store-bought breadcrumbs topped the florets and we put it in the over for about 20 minutes, along with the chicken, to bubble up and brown.


As you can see, there were no leftovers on this one!

Wednesday, February 23, 2011

Curried Butternut Squash with Cous Cous

We're continuing to experiment with curried dishes around here - this one was a moderate success. 

(warning, what follows is a tangent!)  Has anyone else noticed that the grocery stores seem to have suddenly given up on butternut squash in the natural state?  It seems that all of a sudden, everyone's decided it's just too much work to peel one of those curvy cucurbita maxima (winter squash) so now you have to buy pre-peeled and pre-chunked squash in a plastic tub.  We are going to have to look harder!  For one thing, they're sometimes not as fresh, and for another, I hate throwing out one of those plastic containers when I could be composting the peel.  At least one store around here is selling the chunks from a bin, like they do for salad, so you're only left with the plastic bag to contend with.  But really, what was so terrible about the squash?  Of course, I'm all for convenient food, so the pre-chopped stuff is on my good list for weeknight dinners,  but I do resent not having the choice.  There are a few nights when I'd welcome the opportunity to chop open one of those luscious squashes and scoop the seeds out of it's fresh, sunshine-orange center.

Well, now that we're done with that rant, back to our curry.  We chopped our pre-chopped squash down to size and brought it to a simmer in chicken broth (veggie broth would work just as well).  After about 20 minutes, it was getting tender, and I added about 2 TB of red curry paste.  The squash cooked a little longer, and there was still a lot of stock in the pot.  I didn't have a starchy side, so, wanted to absorb the liquid, we added 1/4 cup cous cous and let it sit in the pot, lid on, heat off, for 5 minutes.


The resulting side was tasty, but a little too thick and gloppy for my taste.  Everyone ate it up, the kids loved the flavors, but next time, I think I will make the couscous on the side and serve the squash and liquid over it.

The flavors went really well together though, and I'm intrigued by some other possibilities - like a more traditional curry with roasted squash.  Now, if only I could find a whole squash!


Tuesday, February 22, 2011

Coconut Chicken Strips with Orange-Endive Salad

I have a terrible tendency to mess with recipes - it's a meddlesome quality that sometimes results in a good twist and sometimes....I learn why the recipe said to do such-and-such. 

With this chicken dish, we learned that there is such a thing as taking it too easy on the oil!  Lucky for us, the results were edible, just not golden.  You'll see what I mean in the photo below.

We started with some buttermilk - soaked the chicken strips (about 1 lb of chicken breasts, cut into thin strips) for about 30 minutes, then dredged them in a mix of 1 cup panko, 1 cup shredded coconut (unsweetened!) and 1 tsp of chili powder.

Now, we've already made some modifications to the original recipe I was inspired by, but here's where I went wrong: I didn't use enough oil in the pan.  The recipe said 3 TB of oil.  I thought I could get by with a large non-stick pan and some canola oil spray.   As the chicken strips cooked, the outer edges of the coconut got very cooked, nearly burning, but the panko crumbs didn't brown at all.  In an effort to lighten the dish, we ended up with some visually unappealing chicken.  When we used a little oil, they looked great.


For the next batch, I used 3 TB of oil in the pan and amazingly enough, they browned.  There are times when I get too impatient and try to cut corners.  Then there are times when I learn the hard way why certain formulas appear over and over in our cookbooks.  Putting some oil in the pan seems like a pretty basic one, hum?

At any rate, we served the chicken strips with some carrots (microwaved and seasoned with a little salt and pepper) and an orange-endive salad.  The endive was just chopped, raw, and tossed with lettuce and segments of a blood orange.  The dressing was a store-bought vinagrette and the contrast between the slightly sweet chicken and the tangy, citrus of the salad was excellent.

The kids love dredging and coating things for the stove top, and I love an experiment, so it was a successful dinner all in all.


Monday, February 21, 2011

Celery Root Salad

Do you ever look at some of the things we eat and wonder who on earth ever dug this thing out of the ground and decided to eat it??  Celery root is a case in point.  Would you eat this thing?


And yet, it's a really delicious thing to eat.  I was often served grated celery root in France as a side dish and never having seen one before, was mighty confused when I'd ask what it was and people would respond "celery".  Because I knew it wasn't any kind of celery we had back in Ohio.

It wasn't until several years later that I realized the French "celery" was "celery root" in english.   It's a hairy, ugly looking thing in its natural state, but actually pretty easy to deal with (don't be fooled by people who bemone the knife-crazy experiences they've had with these things.  A sharp knife is a good thing.).  You trim the rough outside off and chop it into pieces that'll fit into your foodprocessor tube.  Shred it and mix with some dressing.  That's it.  It's got the appearance of cole-slaw, but with a fresh, smooth flavor, seasoned to your taste, it's a great way to provide a light, healthful side to many meals.

Simple Celery Root Salad

Peel a celery root with a sharp knife, working your way around the outside.  Slice off any rough or dry parts. 
Chop the root into food-processor sized chunks and grate.
For dressing a softball-sized root, we used:
2 TB mayo
1 TB mustard
Juice from 1/2 a lemon (about 4-6 TB)
Salt and pepper to taste.

You could also use a vinagrette or other salad dressing in a pinch.


The lemon juice adds a nice tang to the dish.

Sunday, February 20, 2011

Egg Shell Tip

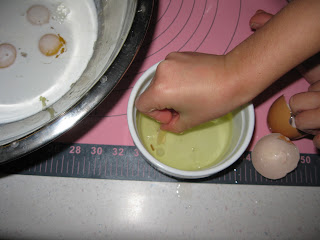
This tip comes from Talia, who taught it to me.  If you crack an egg, and a piece of shell goes into the egg, it's hard to get it out, right?  Chasing those bits around with your fingers is like trying to catch a cat when it's time to go to the vet's office.  Good luck.

Well, if you take a larger piece of shell, you can use it to scoop out the smaller pieces.  It really works.  I don't know why, but there must be a good reason somewhere in the food-science world.

What I do know is she read this in a storybook at school about Hanukkah and the people in the story were making Latkes.  A kid dropped a shell and the grandmother taught her the trick.  Then my daughter taught it to me.  Wish I'd read that book a long time ago....

Thursday, February 17, 2011

Pancetta with Greenbeans - French Friday

I love a simple side of veggies and this was a keeper.  The green beans were fresh at the grocery store (we're lucky to have early veggies here) and I got a 1/4 inch slice of pancetta from the deli counter, then we were ready to roll.

We ate this with shepherd's pie, so I felt like we needed a couple of veggies to round out the plates: boiled beets and pancetta green beans!


The beans were simple.  Boiled for a few minutes in salted water then rinsed in cold, to stop the cooking.  The diced pancetta was browned in a large pan, some fat removed and the beans were tossed back in.  Done.  The browned pancetta bits were crunchy and salty served over the beans.  Easy dishes like this are perfect for the kids to help with.  They were in charge of: 
  • snapping the ends off the beans
  • watching the pot boil
  • timing the various pots of water
  • chopping pancetta
  • stirring the pan
I confess that I was not ready to put them in charge of chopping the red beets.  At least, not until I figure out what removes beet juice from clothing!

You may remember my earlier delight in learning that both kids like roasted golden beets?  Well, I tried red beets, simply boiled, and they were not as big a hit.  I'll have to try red beets roasted next, to see if it's the roasting that makes all the difference!

For all three recipes, check out Around my French Table.


Wednesday, February 16, 2011

Chicken with Coconut Curry

This dish turned out to be a very simple one-pot dinner that required very little effort on our part.  The hardest part was peeling and chopping two carrots and cleaning and chopping some mushrooms.  Once that was done, we were pretty much on mix-and-cook mode.


Veggies prepped, we heated a couple of tablespoons of olive oil, browned four chicken thighs for about 6 minutes each side and poured off some of the oil (you can use a baster to just suck it out if you have a high-temperature baster, or you can just tip the pan over a jar, catching most of the oil - we didn't even remove the chicken!).  We added the veggies directly in with the chicken, tossed briefly then added a can of light coconut milk, a cup of chicken stock, two crushed cloves of garlic and two tablespoons of red curry paste.

I like the flavor of curry but didn't want this dish to be overpowering.  You could add more curry paste if that's to your family's liking.  We also tossed in a couple of stalks of chopped celery, but you could add water chestnuts or another veggies (chopped bell pepper or onion, for instance) depending on what you have on hand.

Once the liquids came to a boil, I turned the heat down to a simmer and let it cook about 25 minutes, until the chicken was tender and cooked through.


We served ours with a prepared mix of wild and brown rice (Uncle Ben's microwave mixes are really handy on a weeknight;although I find them to be a little too salty for everyday use, they are convenient).

This dish was everything you want in a homemade weeknight dinner.  Minimal prep, not too much time at the stove, and it cooks just long enough to set the table, wash up and oversee a few worksheets of fractions and spelling words.

Based on this first foray into homemade curry, I think we'll be coming back down this path!

Chicken with Coconut Curry
4 chicken thighs
1 (14 oz) can of light coconut milk
1 cup chicken broth
two large carrots, peeled and chopped into 1/2 inch pieces
8-10 mushrooms, cleaned and quartered (stems can be removed or left on)
2 stalks celery, optional, chopped into 1/2 inch pieces
2 cloves garlic, crushed
2 TB (or more to taste) red curry paste
Cooked rice or noodles, for serving.

Brown the thighs in 2 TB hot oil about 4-6 minutes each side.  Add chopped vegetables and garlic, toss for about 1 minute, until garlic is fragrant.  Add broth and coconut milk (shake the can well before opening).  Bring to a boil then reduce heat to simmer the chicken for about 25 minutes.

Serve over rice or noodles.

Tuesday, February 15, 2011

Microwave Eggs

It just doesn't get much easier than this.  Grab yourself a newspaper (or tablet or device) and put the kid-chefs to work on breakfast this weekend!

What they'll need:  a small bowl or cup for each egg.  Eggs.  A splash of milk (or half-and-half if you're feeling decadent), a dab of butter and the seasonings of your choice.  And a microwave.

Beware: the eggs must be covered.  Trust me.  We learned that the hard way.


Microwave Eggs

Put a small dab of butter and a splash of milk in a ramekin or small bowl.  Microwave for 20 seconds, just long enough to melt the butter and heat the milk.

Add a dash of salt and pepper along with the herbs of your choosing.  Thyme, Italian seasonings, cayenne pepper, ground chipolte - whatever you like with eggs. 

Break one egg into the ramekin.  Put the Ramekin in the microwave and cover with a plate or plastic-wrap.  Really, you don't want to forget to cover it!  There may be loud popping noises while the egg cooks, but at least it won't get all over the microwave.  The yolk won't explode, but the bubbling up under the whites seems to be the source of all the fuss.

Microwave for 80 seconds.  The egg white should be cooked through, the yolk will be mostly done, similar to a fried egg.

Serve with toast.

Wasn't that easy?

Sunday, February 13, 2011

Quiche Gone Wrong

You know how sometimes everything that can go wrong does?  That was mostly the story of our quiche, as you'll see below.

It started with the eggs.  I swore I had enough in the fridge, I'd even bought some the other day, but when my son went looking, he came back with only two.  We needed four.  I sent him out to the hen house and lucky for us they'd decided to actually earn their keep that morning, because he returned with two eggs. 

He made the dough and pressed it into the pan.  His sister wanted to do the dough too, so there was some argument over that.  It was a weeknight so I'd decided we weren't going to have time to chill the dough for long, just a few minutes before I blind baked it.  I turned the oven on (or so I thought....), I put the crust in the fridge when he was done and...totally forgot about it.

Next step in the recipe was to steam the spinach.  Now here's where the microwave provided the bright spot in the evening's escapades.  I was not about to get out a giant pot of water, boil it, load spinach into a steamer, where it would take on a lot of water, and then wash all those dishes.  Instead I piled it into a big bowl, put some plastic wrap over the mound and stuck it in the microwave on 'fresh vegetables'.  A couple of minutes later I had a nicely drained pile of cooked spinach sitting on my chopping board.  A couple of papertowels helped squeeze the water out and voila - cooked, drained spinach that didn't have that chewy frozen-spinach texture.  This was the high point.

I got the crust out (forgetting that I meant to blind bake it) and poured the quiche mixture in.  Then remembered about the blind baking.  Oh well, another experiment.  I opened the oven.  Stone cold.  I had set the temperature without turning on the oven.  So I cranked it, while the quiche sat in the uncooked crust, and waited.  When it was almost warm, I put the quiche in the oven, set the timer for the higher end of the recommended cooking time (40 mn) and retired to the living room with the sous-chefs to do homework and nibble on chips and salsa.

When the timer beeped, I opened the oven and saw this:


I guess that oven heated right up, huh?

So, after I peeled all the burnt bits off and put them in the chicken's pile, here's what I put on the table:


The ending of the story isn't that bad though.  The quiche was really very good, the crust, while it would have improved with a blind baking, was done.  The filling was 1/2 a large onion and 2 cloves of mashed garlic, sauted with one chorizo sausage, crumbled, then mixed with 2/3 cup half and half, 2 eggs, 1/4 cup parmasean cheese and 1 bag of spinach, microwave-steamed and chopped.  Some salt and pepper and it was good to go into the crust.  We recommend blind-baking the crust.  And not burning the quiche.

Passable for a weeknight.

Saturday, February 12, 2011

Almond-Orange Tart - French Fridays with Dorie

This tart's unusual combination of orange segments and almond cream filling was delicious.  It helped that we had the tart last weekend, so we could anticipate some of the steps that required time (letting the orange segments dry on paper towels in the fridge, for instance) but it wasn't an overly complicated dessert and well worth the effort.  

The crust was a traditional pate sucre, made in the food processor and chilled, and the almond cream was also processed and chilled.  The only minor trouble we had was finding almond flour - it wasn't available at either of the grocery stores we went to this week, so we made our own by grinding whole almonds until they were flour-like.  I suspect our filling had more texture than intended, but it was wonderful.


Once everything had been chilled and assembled, the tart took about 40 minutes to bake.  It was heavenly.  The almond filling browned and developed a slight crunch between the orange segments, which remained meaty and flavorful.  A dash of powdered sugar was all it needed.


We're already planning some variations on this one - cherries or apricots, anyone?

Recipe can be found in "Around my French Table" by Dorie Greenspan.  See also: French Fridays with Dorie

Thursday, February 10, 2011

Sometimes it's so Simple - Rootbeer Floats

It may be February, cold and rainy, but we can still dream about summer.  The other night, we had root-beer floats for dessert and they were perfect.  Our favorite babysitter had the inspiration to get ice-cream (french vanilla) and cream soda.  There were a couple of root-beers in the fridge, holding down a back corner of one of the shelves, and voila: dessert was made.  We were divided on cream-soda versus root-beer.  I'm a purist on that one.


It's hard to beat this dessert.  We used to go to the drive-up A&W for chili dogs and floats when I was a kid and something about that creamy, fizzy concoction always says summer and fun to me.

When I was lucky enough to be relatively penniless in Greece for a week one summer, a long time ago, I convinced the woman at the cafe in the village I was staying in to mix me a float.  She didn't have root-beer, and she didn't have vanilla (or maybe our language difficulties got in the way on that one) and she really didn't *want* to mix soda and ice-cream.  I finally convinced her to sell me a glass of sprite and a dish of pistachio ice-cream.  I plopped the ice-cream into the soda glass and handed her back the dish.  Talk about the right kind of summer lunch!  For the next few days, she sold me the ice-cream and soda, always in separate dishes, and looked disgusted when I handed her back the ice-cream dish.

I'm sure I didn't do the american tourist any favors, and I haven't heard about a new ice-cream-float craze in Greece since then.  But sitting on the sidewalk, watching a couple of kids play, feeling the heavy heat and sunshine pour down after a morning of visiting ruins - well, it doesn't get much better than that.

Wednesday, February 9, 2011

Hachis Parmentier - Comfort Food with a High Flash-to-Bang Ratio


This was comfort food of the highest order.  Hachis Parmentier, the french name for shepherd's pie, is essentially chopped beef under a mashed-potato topping.  Hachis means chopped, but I had to look thumb through wikipedia to learn that Parmentier was a nutritionist who convinced the french to eat potatoes.  And we are thankful for his work!


Parmentier had nothing to do with the flash-to-bang ratio though - that term comes from our army-based family member who has shared the ever-useful term with us.  High flash-to-bang?  You get a lot of flash for the size of the bang.  Low flash-to-bang?  It wasn't really worth the effort.  You can see how this could apply to cooking, right?

This dish had flash.  We made it on a Saturday and therefore had time to babysit a large pot of simmering beef while it became tender and made bullion.  We then had time to boil potatoes and mash them up.  Then we had time to chop the cooked beef into delightfully small pieces (this actually took relatively little time since it was falling-apart tender).  The hands-on time wasn't terrible, but it was worth every moment.  And I am really glad we made a double batch!  It freezes well and the leftovers are even better.


It was agreed by all that this was a keeper, and worth making from scratch.  There's a full recipe and a shortcut version using ground beef in "Around my French Table," or you can find recipes online.

Monday, February 7, 2011

Ouch!

It all started so innocently.  A pile of potatoes, two peelers, some chatter.  Next thing I know, my daughter is squeezing her finger and holding back the tears.

"I hurt my finger and I..am..pressing..on it."

Of course, I had to look.  Lucky for us, she just nipped the corner and while it hurt, it wasn't anything some soap and water and neosporin couldn't handle.

But, oh my, I had one of those moments.  Why wasn't I watching?  What if it had been worse?  Thank goodness it was only a peeler...but still!  You know that voice, the Bad Parent voice that lurks in the back of our mind, second guessing and criticizing?  All for a little nick.

She didn't cry and the band-aid seemed to make everything feel better, but I peeled the rest of the potatoes myself while she sat on the stool and talked to me.  It's a tough world out there - for kids and parents alike.  Here's wishing you safe dinners and, if needed, a box of band-aids in near reach.

Friday, February 4, 2011

Basque Potato Tortilla - French Fridays

This evening was our first foray into French Fridays with Dorie and it was a gastronomic success, but it took some getting there!

I managed to get home a little early this evening so we could make this recipe from Around My French Table - it was really tasty, but even with the extra time, we ended up having a pretty late dinner; it probably took about an hour to get the Tortilla and some veggies on the table.  We were making two new recipes, so that adds some time, flipping back and forth between pages, trying to keep track, but I think the main culprit this evening was the potato. 

The recipe calls for 1/2-1 inch chunks of potato, cooked in the cast-iron skillet for about 20 minutes.  It took closer to 40 minutes for ours to be cooked through.  I think I'll try this again, with the cheater's step of microwaving the potatos (tossed in olive oil) first, just long enough to get them started.  I don't know if that'll make them stick to the pan, but since you have to wipe the pan clean before you put the egg mixture back in, it seems to me that you could cook the potatoes in a non-stick pan first, then heat the cast-iron skillet for the final oven-browning.

As you can see, it was a beautiful dinner, but since it was a Friday, we had the luxury of not rushing dinner.  This is just our first shot at one of the recipes in the book, and it was so good we'll work our way through the others, for sure! 


My daughter really enjoyed showing off her salting technique, while the potatos were cooking, so it was time well-spent, nonetheless.


I can't post the recipe here (part of the rules - besides, you should buy the book - it's beautiful!) but it's essentially a fritatta with cooked potatos, rosemary, garlic and onions.  Probably good left over too - not that we'll know....

Wednesday, February 2, 2011

As Easy as Boiling Water

One thing I've noticed is that cooking with kids is not for the faint of heart. 

This week, I decided to push the limits a bit and asked my son to boil the noodles for our classic mac and cheese (see mac and cheese post for the recipe) before I got home from work.  We were going to be pressed for time and having that step out of the way would help get us to our evening class on time.

I gave him instructions over the phone.

"Do you know what to do?"

"Yeah, I boil the water then add the noodles."
"Right, and cook them as long as the package says.  The whole box."

"Okay."

"Start at 4:30, okay?"
"Okay."

At 4:35, my phone rings.  Not good.  "Uh, mom?  The stove is smoking and I don't want the smoke alarm to go off!"

"Is it still smoking?"

"No, I turned it off because I don't want the smoke alarm to go off."

"It won't.  It's smoking because I cleaned the stove.  It'll stop in about 30 seconds.  If it doesn't, turn it off and wait until I get home." (clearly, it is unusual for me to have just cleaned the stove...)

"But will the alarm go off?"  (clearly, he does NOT want the alarm to go off!)

"It won't."

"Okay."

So, for the next twenty minutes, the phone does not ring and I am having visions of the house catching on fire.  It doesn't help that I work next to a fire station and there must have been a fire somewhere becuase the truck went out, lights flashing, sirens blaring.  I was about to pack up and leave when the phone rang again.

"The noodles are done.  What do I do now?"
"Everything's okay?"
"Yeah, mom."
"Did you take them out of the water?"
"Uh, no."
"You know where the colander is, right...."

When I got home shortly thereafter (house still standing, everything as it should be), this was in the sink:


Beautiful.


We ate dinner, had the rest of our evening as planned and it was good.  As we ate, my son proudly announced that it was really good.  And he'd help make it. 

I'm left wondering if I should clean the stove more or less often.....