Well folks, here are a few recipes in an easy-to-read download.
We hope you enjoy the food and enjoy spending some time with your kids in the kitchen over the next couple of weeks.
We’ve included a full dinner with Falafel Chicken, a simple corn-ham soup, home-made pancakes for a weekend morning and our favorite party-sized quiches which are great for hosting people, but make an easy snack from the freezer to enjoy yourself.
The recipes are broken down into a shopping list and a pantry list – checking the pantry before we go to the store is a great kid-task!
I haven’t specified what part of the cooking is done by the kids, since that will depend a little on your kids’ ages, skills and ability. Generally, I’ve found that measuring, mixing, stirring and fetching ingredients are easy first tasks.
I hope you’ll find some time to get together with your family and test a few of these recipes. Please feel free to pass this along and let us know what you think.
Wishing you many happy meals!
Talia's Table
Sunday, December 19, 2010
Friday, December 17, 2010
Tortellini with Chorizo Sauce
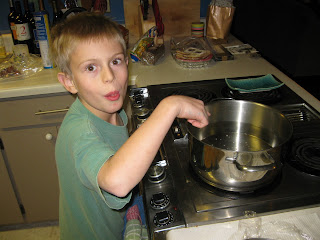
We made this dinner last week, another easy comfort-food dinner, made with pantry and freezer ingredients.
Served with a side of veggies (carrots and zucchini cooked in the microwave), it's a simple but wholesome dinner.
My son wanted to be in charge of dinner, so I directed and he prepared. It was fun, and simple enough that he could do it all himself, starting with salting the pasta water.
I buy chorizo at the grocery store, in the meat section near the hotdogs and hispanic foods, and keep them in the freezer since I never use more than one at a time and they're sold in packs of 8.
One thing we learned the hard (messy!) way is don't forget to pierce the skin of the sausage if you decide to defrost it in the microwave. Ka-Boom!
Of course, that's how my son learned the all-important lesson: when something explodes in the microwave, clean it up right away!
Tortellini with Chorizo Sauce
1 chorizo sausage
1 can (15 oz) diced tomatoes
1/2 cup V8 juice*
1/2 cup chicken broth
1/2 cup diced onions
1 lb dried tortellini
* if you don't have V8, you can substitute a small can of tomato paste and use 3/4 cups chicken broth instead)
Put a large pot of water on to boil, salted and covered.
Brown the sausage in a wide non-stick frying pan. Add the diced onions (you may have these in the freezer if you do this) and cook until the onions are soft. Add the liquids and bring to a simmer.
By this time, your water should be boiling. Add the tortellini and cook according to the package (typically about 11 minutes).
Let the sauce simmer while the pasta cooks. Microwave the veggies and set the table.
Drain the tortellini and add them to the sauce. Mix and serve.
Total preparation time: about 20 minutes.
For the record, it's helpful to actually put the vegetables on the table when you eat, instead of leaving them in the microwave where you will find them the next morning....

Served with a side of veggies (carrots and zucchini cooked in the microwave), it's a simple but wholesome dinner.
My son wanted to be in charge of dinner, so I directed and he prepared. It was fun, and simple enough that he could do it all himself, starting with salting the pasta water.

I buy chorizo at the grocery store, in the meat section near the hotdogs and hispanic foods, and keep them in the freezer since I never use more than one at a time and they're sold in packs of 8.
One thing we learned the hard (messy!) way is don't forget to pierce the skin of the sausage if you decide to defrost it in the microwave. Ka-Boom!
Of course, that's how my son learned the all-important lesson: when something explodes in the microwave, clean it up right away!
Tortellini with Chorizo Sauce
1 chorizo sausage
1 can (15 oz) diced tomatoes
1/2 cup V8 juice*
1/2 cup chicken broth
1/2 cup diced onions
1 lb dried tortellini
* if you don't have V8, you can substitute a small can of tomato paste and use 3/4 cups chicken broth instead)
Put a large pot of water on to boil, salted and covered.
Brown the sausage in a wide non-stick frying pan. Add the diced onions (you may have these in the freezer if you do this) and cook until the onions are soft. Add the liquids and bring to a simmer.
By this time, your water should be boiling. Add the tortellini and cook according to the package (typically about 11 minutes).
Let the sauce simmer while the pasta cooks. Microwave the veggies and set the table.
Drain the tortellini and add them to the sauce. Mix and serve.
Total preparation time: about 20 minutes.
For the record, it's helpful to actually put the vegetables on the table when you eat, instead of leaving them in the microwave where you will find them the next morning....

Thursday, December 16, 2010
Spaghetti and Meatballs
Just in case you think we've been doing nothing but partying, we wanted to pass along these easy meatballs for one of those nights when you need a quick, satisfying dinner.

Cranberry Meatballs
.75-1 lb ground beef (I recommend the 80/20 grind for quick dinners. The 90/10 tends to be a bit dry unless you're cooking the meatballs for a very long time in the sauce.)
1/3 cup dried cranberries
1/4 cup pine-nuts
3 TB ketchup
1/4 cup breadcrumbs
pepper, salt and ground cayenne to tast (typically 1/4 tsp pepper and salt, 1/8 tsp of cayenne)
In a bowl, mix all the ingredients with your hands, then form the meatballs between your palms, rolling evenly sized balls about 1 inch wide.
Heat a large non-stick saucepan with a skim of olive oil. When the pan is hot, add the meatballs and cook over medium heat, shaking the pan frequently, until the meatballs are darkly browned on all sides, about 10-13 minutes, depending on the quantity of meat used and your stove's heat.
Add tomato sauce (we used a jar, but you could make tomorrow's sauce if you're feeling leisurely) and cook until the sauce is thoroughly hot and bubbling. If you're not sure, you can split a meatball open to check for doneness.
Serve over the spaghetti or noodle of your choice. We prefer angle hair for this dish.
Wednesday, December 15, 2010
Window Pane Cookies
If you happened to see the post about our eggnog party, you might have wondered what those lovely, glossy, delightful cookies were up front....
They go by various names, jelly cookies, spitzbuben (their "real" name), or window pane cookies when we make this version with our square cookie cutters. The original recipe, which is swiss or german in origin, used a butter cookie dough, but we usually add some ground hazlenuts to the dough, which makes them more like an austrian linzer tort.
The general idea is to make an equal number of tops and bottoms - they're the same shape and size, but with a window cut out of the tops. Dust the tops with powdered sugar and sandwich some jelly between the layers, and they're good enough to hide a few away when company comes.
What you see here is the last step in the assembly process:


The kids love rolling the dough, sprinkling the tops, assembling and, of course, eating!
You can find other recipes on the web for spitzbuben, but here's the one I've been using, adapted from my mother's holiday notebook.
They go by various names, jelly cookies, spitzbuben (their "real" name), or window pane cookies when we make this version with our square cookie cutters. The original recipe, which is swiss or german in origin, used a butter cookie dough, but we usually add some ground hazlenuts to the dough, which makes them more like an austrian linzer tort.
The general idea is to make an equal number of tops and bottoms - they're the same shape and size, but with a window cut out of the tops. Dust the tops with powdered sugar and sandwich some jelly between the layers, and they're good enough to hide a few away when company comes.
What you see here is the last step in the assembly process:

My mother put a small note on the bottom of her recipe when she passed it along to me that said "do this over the sink." I didn't fully appreciate that note until I sprinkled powdered sugar all over my countertop the first year. That's why we're putting this tip up top! A drying rack over the sink and a small sieve (or you can use a sifter, but I think they're a pain to clean!) makes cleaning up the sugary mess a snap.
We melt the jelly in the microwave, about 45 seconds for a small jar, emptied into a bowl. It has to be cool enough not to run all over the place, but liquid enough to get a smooth, glossy blob on the bottom. You can see from the picture that you want your jelly blob to be just big enough to reach under the edges (think glue) but you don't want it smooshing out the edges. While this takes practice, the up side is you can eat your mistakes.

I bake my cookies on parchment paper for two reasons. It makes swapping out the pans easy, because they're essentially clean under the paper and because you can slide the entire sheet of cookies off your cookie sheet onto the cooling rack. I find I break fewer tops this way.

These cookies are extra work, like any roll-out cookie. I portion the dough into several lumps to refrigerate because it's easier to work your way through a small batch of dough before it gets too warm and soft to handle (and that doesn't make for good cookies either). That said, I always make a double batch, because they are everyone's favorite. Well, they're my favorite!

You can find other recipes on the web for spitzbuben, but here's the one I've been using, adapted from my mother's holiday notebook.
Spitzbuben
2 sticks of unsalted butter, room temperature
1 cup powdered sugar plus more for dusting the tops
2 large egg yolks
2 1/3 cups all-purpose flour (you can substitue up to 1/3 cup of the flour with finely ground hazlenuts but if you use more nuts, the dough will be dry and crumbly. I put the whole nuts in the food processer and run it until they have the consistency of cornmeal)
For the filling: 2/3 cup (1 small jar) seedless rasberry jam. Blackberry jam is also good.
Beat butter with an electric mixer until it is light and fluffy. Add the sugar and combine well. Add yolks beating well after each addition. Add flour and fold in thoroughly. Divide the dough into two equal portions and wrap in plastic wrap. Press it into even squares and refigerate until firm, at least 2 hours.
Preheat oven to 350*. Line two sheets with parchment paper. Lighly flour your working surface and roll the chilled dough out to about 3/16 inch thick. Using a 2-inch cookie cutter, begin cutting tops and bottoms. Tops have a smaller shape cut out. If you don't have ideal cookie cutters, you can use a round biscuit cutter for the larger size and a pastry bag tip or small shot-glass for the center cut-out.
I recommend doing a sheet of tops and a sheet of bottoms so you have the same number of each in every batch.
Put them in the oven, reduce the temperature to 325* and bake for about 12 minutes until they are golden brown. Transfer the parchment paper to cooling racks to cool completely.
Tip: let your cookie sheets cool thoroughly between batches - a warm sheet will begin melting the cookies as you put them on and they will look uneven.
When you're ready to assemble the cookies, follow the instructions above.
The cookies keep well between wax-paper layers in an airtight container for up to two weeks (or so I've been told!) You can also make the cookies ahead of time and freeze them in ziploc bags for a month without powdered sugar or jelly, then assemble when you're ready.
Here's hoping you enjoy your own version of this delicious tradition!
Tuesday, December 14, 2010
Bite-Size Party Quiche
These bite-sized delights are one of the best party foods I've come across. They're mini-quiche in puff-pastry shells. You can make them the day of, you can make them ahead of time and freeze them and they reheat like a charm. They're tasty and you can change the fillings to suit the event. The original recipe I got from my mother has leeks and bacon in it and it's tough to improve on that. But we've made them with leeks and smoked salmon, turkey and no onions, small pieces of ham, or whatever combination suits your fancy!
Two things make this recipe easy. Invest in a few mini-muffin tins. They're not expensive and if you can bake 4 dozen at a time, this recipe is a snap. If you have to wait around for a dozen to bake before you can rinse, cool, and re-fill the pan, this recipe is tedious. Trust me.
The other tip: don't forget to spray the pans. Let me repeat that: Don't Forget to Spray the Pans. You got it, that was the voice of experience speaking. If you forget to spray the pans, the little, lovely, tasty quiches will stick right to them like glue and you will have some pretty ugly little things to plop on a plate for your guests. If you dare. So, with those two things in mind, let's head to the main event.
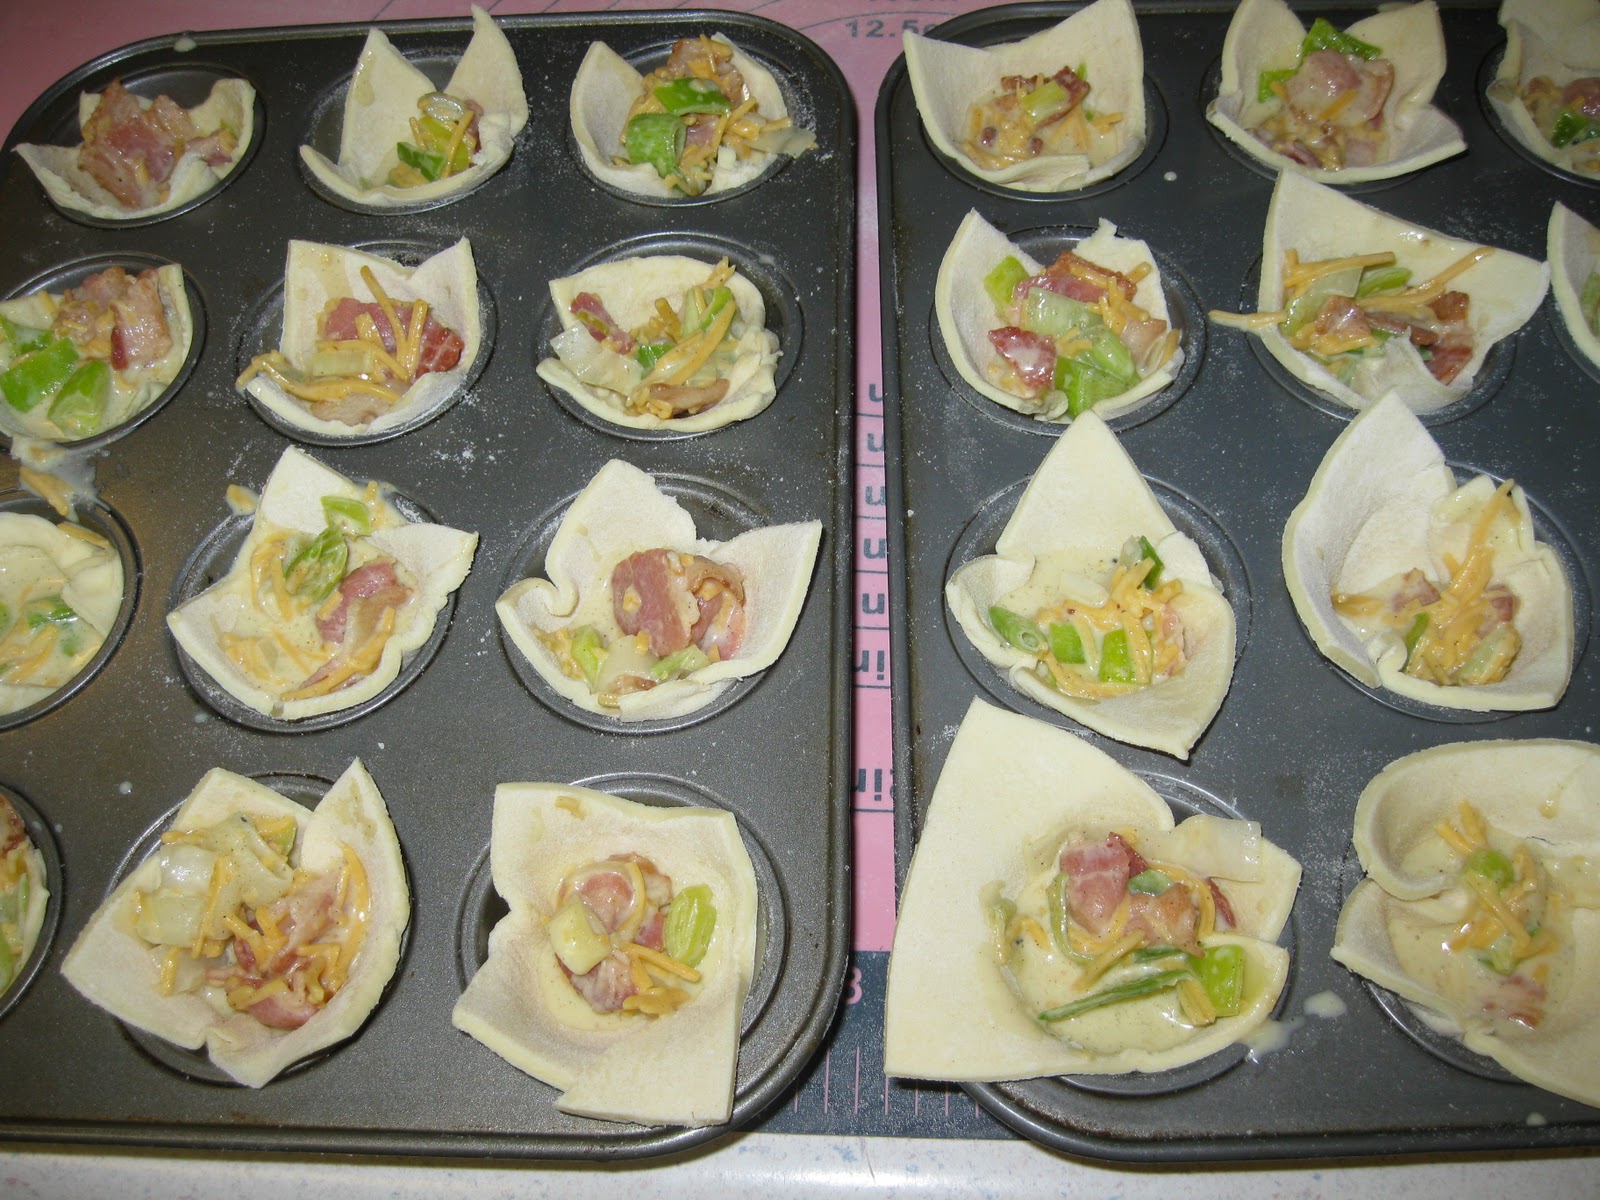
The recipe called for cutting little circular pieces of puff pastry then re-rolling the scraps, like cut out cookies. We use little square (no scraps!) and let the corners stick out. They look home-made and irregular but not a single person has ever said "gee, I wish you'd make those with round edges." So we're okay with that. And it's a lot simpler.

The filling is simple. Some half-and-half, yolks, cheese and savories of your choice. Salt, pepper, nutmeg and you're good to go.

As I said, we made ours with bacon and leeks this year.

If you use leeks, don't forget to slice them and then swish them around in some cold water to get any sand out before you cook them.

We use the tablespoon measuring spoon to scoop the filling and it's the perfect size. They cook for about 12 minutes then you can serve them, keep them in the fridge for a few days or freeze them for up to 3 months. To reheat frozen ones, about 10 minutes on a cookie sheet at 250* will do it.
And we actually did have a couple of scraps left over. So they were sprinkled with a little sugar and baked for about 5 minutes to make some scrappy little cookies. Double the yum!
We'll put the full recipe for these treats in our cookbook download, coming later this week, so check back!
Sunday, December 12, 2010
Did You Miss Us?
Sorry to be away so long, but we were thinking of you. Really, we were! We had our annual Eggnog party last night, so we've been baking up a storm and cleaning house, but we've taken photos along the way and have lots of fun to share with you.


The center piece is always the eggnog, but we noticed this year that the mini-quiche and veggie platter disappeared at an astounding rate. Next year we'll have to make more quiche (and fewer cookies? or just invite more guests!?)
The eggnog is easy - we use the Joy of Cooking's recipe for "Eggnog in Quantity" but there was a similar one in the New York Times dining section just last week.
We'll post some of the cookies and quiche recipes here in the upcoming days, so if you're in need of some party food, check back!
Monday, December 6, 2010
What's your pleasure?
Well friends, we're going to do a little cookbook for you all. A little stocking stuffer for you. We'll probably put a few of our most-visited recipes in a fully-detailed booklet.
What's your pleasure?
What's your pleasure?
Blackened Catfish
I remember sitting with my grandmother in a seafood restaurant when I was about 18 years old, debating the merits of catfish. She loved catfish. I didn't.
"Fried. Or blackened." She declared. As if that was all we needed to know in order to bring the conversation to a close.
"But it's so ... fishy!" I remember countering. I liked fish, shellfish, and lake fish, but catfish always left me feeling like it came from the bottom of the lake.
Perhaps it was all the times my sisters and I teased the catfish in the lakes across the street, tapping the top of the waters, bringing their gaping maws to the surface, like some sort of home-made horror movie. Low budget.
Catfish? No thanks.
Recently however, I came to the conclusion that time has turned the tables. If you buy catfish these days at the grocery store, it lacks that distinctive flavor that my grandmother so enjoyed and I didn't. I think it's because of the farming that has made catfish plentiful and rather mild in flavor.
We made blackened catfish the other night and it was simple to prepare. Cast iron pan, heated hot and lightly coated with some olive oil. Fish filets rubbed with a cajun seasoning. Three minutes per side. Couldn't be simpler.

Served it up with some sauted green beans and rice. Simple, flavorful.
So, grandma, we're enjoying the catfish. Blackened. But I have to confess that for a moment last night I missed that muddy bottom-of-the-lake flavor.
Thursday, December 2, 2010
Pie Weight Stand-In
We were making our pie crusts for Thanksgiving and I was thinking about how long I'd waited to get pie weights. I'd either skipped (with bubbled crusts as a result) or used beans in a pinch (with acceptable, but wasteful feeling results). I finally got a set of pie weights a few years ago and have been very grateful - they work just like they're supposed to and they're always sitting in the cupboard where they belong.
What I didn't do was get two sets.
So, when it was time to bake two empty crusts, I was in a bind. Except, a bright kid saved me. I'd borrowed his bag of marbles to put in the flower vase and when he brought them down I said I planned to use them for flowers.
"Oh, I thought you were going to use them in the crusts."
So I did.

A colleague of mine mentioned the other day how her kids push her to remember to be creative. Add this example to the list!
They worked just as well as the pie weights, so if you've got a jar of out-grown marbles, I recommend moving them down to the kitchen cupboard in a jiffy.
Wednesday, December 1, 2010
100th Post
It feels like this is still a new adventure for us - taking photos, getting recipes up on the web and collecting ideas for growing kids into chefs- but when I sat down this evening to put together a post, I realized this is the 100th post for Talia's Table. That's kind of neat. I'm proud of my kids for hanging in there, and hanging out in the kitchen. We've covered a lot of territory between school, work and play, with some good eats on the way.
So here's a small collection of some favorite photos, and more recipes and ideas yet to come!


So here's a small collection of some favorite photos, and more recipes and ideas yet to come!


Hope you'll join us for the next 100 posts!
Saturday, November 27, 2010
Gifts for Kid-Chefs
We have here the monkey-peeler. This is one of the many cute tools you can find these days in kitchen stores. It's been a while since Alessi began making household tools with faces and personalities; now the whimsical Italian inspiration has spread to mouse-shaped cheese shredders and monkey-shaped veggie peelers.
Is this good? Well, I think that depends on the tool.

In this case, she can hold the grip more easily than the traditional horizontal peeler and she loves using her special peeler. So, she likes to help peel.
I'd say that's working.
When the whimsy of the tool gets in the way (oddly shaped knife handles are not as practical, for instance) it's not working for us.
If you're out there looking for some kid's gifts for the kitchen this year, here are some suggestions to start with:
- A step-stool - if you're only going to invest in one kid-chef item, this is it!
- Child-sized apron
- Measuring spoons and scoops - look for easy-to read numbers and sturdy construction
- Glass measuring cup - 1 and 2-cup sizes
- A knife they can handle
- Non-slip cutting board
- Small bowls, lightweight metal or plastic for measuring out ingredients
- A timer
- Small silicone spatula
- Silicone rolling mat for dough
Wednesday, November 24, 2010
Baked Apples - Not Quite There Yet....
I like the way these photos show the evolution of our baked apples:


You'll notice that these apples somehow managed to be half-firm, half-collapsed. I'm befuddled. We used the same recipe before and the apples were fantastic. This time, they weren't. And neither kid is interested in eating the leftovers (that was most decidely not the case last time around!)
We'll have to get back with you on this one.
In the meantime, back to Thanksgiving preparations!
Monday, November 22, 2010
Pie Crust - Homemade and Ready-Made
What is it about pie crust that's so intimidating?
Is it knowing that you can just buy a frozen one and be done with it? Or all the lengthy essays about exactly how cold the butter should be and how much better your grandmother's homemade crust was? Whatever it is, pie crust is often held up as a holy grail, unattainable by most home cooks. And yet, it's really not all that hard.
Here are the basics: cold butter, plan ahead, and pie weights.
Here's what not to do: freak out because you've developed a pie-crust phobia built on unexamined notions of what a 'real' baker would do so you just can't handle it, buy a store bought pie and regret the ingestion of soggy lard-laden crust.
Here's the back-up plan: ready-made.
Let's start with the back-up plan because, really, ready-made has come a long way and we're busy people, right?
You can find ready-made crusts that are frozen, unbaked, and not full of lard or trans-fats. Check your organic or yuppie food-store of choice or the grocery store's freezer case. Yesterday's pumpkin pie recipe calls for a blind-baked crust. That's easy. Let your pie crust defrost on the counter for a while until it's firm, but not as hard as a rock. Put a piece of tinfoil over it and fill it with beans or pie weights. Bake according to the instruction for homemade crust (below). Voila: ready to fill. That was easy, wasn't it?
So, now you're ready for the homemade version, and you're not freaking out. Read this recipe a few times, get the process in your head and remember, it's all about keeping the butter cool and not working too hard at this. After all, if your great great grandmother had time to feed the hens, milk the cow and make an occasional pie-crust, she wasn't after perfection, right?
All-Butter Piecrust (one 9" crust)
The beauty of this crust is that you can make it well ahead of time and refrigerated it over night or freeze it (in a ball or rolled flat and ready to go) for up to 3 months. If you freeze it, just put it in the refrigerator the night before you plan to make your pie, and it’ll be ready to go. You can also make double the recipe for a pie with a lid.
1 1/3 cup (6 oz) unbleached all-purpose flour
1 tsp granulated sugar
3/8 tsp table salt
8 TBs (1 stick - 4 oz) cold unsalted butter cut into 3/4 –inch pieces. European style butter is denser and more tasty, but regular unsalted butter works too.
3-4 Tbs ice water
1. Put the flour, sugar and salt in a medium bowl and stir to combine. Add the butter to the bowl and get ready to use your hands. Rub the cold chunks of butter between your fingertips, smearing the butter into the flour to create small (roughly ¼ inch) flakes of fat. Don't be a perfectionist here. The idea is to get the butter broken down into small flour-coated pieces (like oat-meal flakes) without melting it with your hands.
2. Drizzle 3 Tbs ice water over the flour mixture, Stir with a spatula or fork, adding 1 Tbs. more water if necessary, until the mixture forms a shaggy dough that’s moist enough to hold together when pressed between your fingers. There will be crumbly bits of flour in the bottom of the bowl and the dough may not have a consistent color or texture, don't worry. As long as it starts to hold together like old play-dough, you're good. It'll come together in the next step.
3. With well-floured hands, gently gather and press the dough together, and then form it into a disk with smooth edges. Wrap the dough in plastic and chill for at least 1 hour, but preferably 2 to 4 hours, before rolling. I usually have some edges and bits that don't quite cling together. Just put them in the ball, press it plastic wrap around it and chill. When you roll the dough out, it'll come together. Remember, cold butter trumps perfect looking dough at this stage.
4. Let the dough soften slightly at room temperature – it should be cold and firm, not rock hard.
5. Lightly flour the countertop and roll the dough from the center out, turning the disk of dough so you get a consistently circular shape. Since you're going to trim the edges, go for the right size in as few rolls as possible. The more you work the dough, the tougher it'll get. When it’s 13-14 inches in diameter and about 1/8 inch thick, you're done. You'll notice as you roll that the dough takes on a 'normal' pie-dough consistency and all those little bits have become part of the crust. Congratulations! Reflour only as needed.
6. Transfer to a 9-inch pie plate (I like the $3 metal ones with a wide lip). Don't stretch the dough as you put it in the pan. Trim the overhanging dough to 1 inch from the edge, roll the dough under itself into a cylinder that rests on the edge of the pan. Crimp. Look online for instructions for how to crimp.
7. Refrigerate until firm – 1 hour. Warning: no matter how tempted you are, do not skip this step! Remember: cold butter.
8. Bake at 425*F, lined with foil and dried beans or pie weights, for 15 minutes. Remove the foil and bake at 375*F another 5-7 minutes until the bottom looks dry but not quite done and the edges are light golden.
Fill according to the recipe and continue on to pie-bliss.
Great-great-grandma would be proud. If she had time. After all, she had a farm to run.
Happy baking!
Check out the pie crimping and decorative edges video at Fine Cooking (issue #101, on which I based this recipe) http://www.finecooking.com/pages/fc_onlineextras.asp
Also, Martha, love her or not, has some good videos online at: http://www.marthastewart.com/see-and-celebrate-thanksgiving
Sunday, November 21, 2010
Best Ever Pumpkin Pie
Thanksgiving is nearly here and it's one of my favorite holidays. No gift buying, and it's all about food. Nearly a perfect holiday, as far as I'm concerned.
However, there is one highly divisive issue that surfaces this time of year: pumpkin pie. There are those for whom the holiday isn't complete without it, and those who gag down that geletanious mass pretending to be dessert. I personally stray into the latter camp.
But surrounded by those who love pumpkin pie, I've continue to try new variations, sampled chiffon pumpkin pie (a good alternative, thanks mom!) and ignored the store-bought ones.
Then, last year, I ran across this recipe in Fine Cooking magazine (Oct/Nov 2009 issue) and figured I'd give it a whirl. I test-drove it at an office party the week before Thanksgiving and it was amazing! With a few tweaks, it was ready for our dinner on Thursday.
The pumpkin-pie-lovers and the pumpkin-pie-deniers came together over this pie. Here's hoping it brings unity to your table too!
Coconut-rum Pumpkin Pie (originally Jamacian Spiced Pumpkin Pie)
1 15-oz can pumpkin puree (do not use pie filling, it's pre-seasoned and the pie won't turn out right)
1 ¼ cups unsweetened coconut milk, (do not use 'lite' coconut milk, shake well!)
¾ cup packed brown sugar (I prefer dark, the original recipe called for light)
1 tsp ground ginger - if you have access to fresh ginger, I recommend taking the fresh-ginger option, described below)
¾ tsp ground cinnamon (saigon cinnamon from McCormick's has a delightful kick for this pie)
½ tsp table salt
1/8 tsp freshly grated nutmeg (yes, it's better if you have a little grater and a whole nut, but I use the ground nutmeg from the store - no complaints!)
4 large eggs, room temperature
2 TBs spiced rum (if you don't drink rum, you can buy a mini bottle and it'll be just the right amount)
1 blind-baked all-butter piecrust - or one frozen piecrust, prebaked. We'll get to this tomorrow.
Put a heavy-duty rimmed baking sheet on the middle rack of your oven (to catch any drips), and pre-heat to 435*F.
In a large bowl, whisk the pumpkin, coconut milk, sugar, ginger, cinnamon, salt, and nutmeg until smooth. Whisk in the eggs and then the rum, until the mixture is smooth. Pour the filling into the piecrust.
*if you have freshly grated ginger, before you begin mixing the ingredients, put the ginger in a glass measuring cup with the coconut milk and heat in the microwave for 1-2 minutes until it's hot but not boiling. Let the ginger seep into the milk for 5 minutes, then make the filling. You may strain the ginger out of the milk, but I prefer to leave it in for texture.
Put the pie on the heated baking sheet. Bake for 10 minutes and then reduce the oven temperature to 350*F. Bake another 45-55 minutes until the center of the pie is nearly firm when you nudge the edge. It won't be completely firm, but should have the consistency of set Jell-O.
Cool on a rack before serving. The pie lasts at room temperature for up to 2 days.
Adapted from Fine Cooking, Oct/Nov 2009
Saturday, November 20, 2010
Thanksgiving Warm-Up
The other night, we got a jump-start on Thanksgiving with some turkey drumsticks.

They made a super-easy and inexpensive dinner with some roasted acorn squash and cranberry jelly. I don't know about you, but around here, the mass of cranberry jelly straight from the can is a highly-prized addition to the menu!
Here's what we did:
We put three turkey drumsticks, lightly sprinkled with kosher salt, ground pepper and ground sage, in a baking dish and covered loosely with tinfoil. I spray the dish with Pam so it's easier to clean afterward.
The drumsticks cooked (covered) in a 400*F oven for about 30 minutes.
Along with the turkey, we put an acorn squash in the oven. To prepare the squash, cut it in half, scoop the seeds out with a spoon and put the sides hollow-side up it in a dish with sides (I used a foil-lined cake pan). I like to put a small piece of butter (1/4 TB) in each half to keep it moist. Some people season the squash ahead of time, but I prefer to let everyone season it at the table with salt and pepper since the sweetness of each squash can be different.
After 30 minutes, I removed the foil from the drumsticks, let them cook another 5-10 minutes and checked the internal temp - 165*F and they're done!
The acorn squash is done around the same time. If the flesh gives easily when you poke it with a fork and it has developed a darker, more moist look, it's ready to eat.
Let the turkey legs rest a few minutes while you put everything on the table, and voila - pre-Thanksgiving delights!
Tuesday, November 16, 2010
Freezer Tips
Have you heard about umami? Tastyness - borrowed from a japanese word - it's the "other" flavor. Not salty, sweet or sour, it's the savory flavor of soy sauce, sauted mushrooms, the browned bits on the bottom of the roasting pan and...tomato paste. Which brings me to a question. Why do they still sell tomato paste in those cans? Rarely do you actually need a whole can, right? We were making a chicken pot-pie recipe and it called for a couple of tablespoons of tomato paste.
Yes, you can buy tomato paste in a tube and squeeze it out as you go (a fantastic idea!) but I was out. A while back I'd had the same problem and after using a tad of paste put the leftover tomato paste in a ziploc in the freezer. I didn't have a great plan, I just hated to throw out a bunch of tomato paste.
Well, it turns out this was a good idea. The paste freezes well and I was able to break off a couple of pieces and just drop them into the pan. They defrosted in seconds and it was easy to stir them up.

But the most important part? Putting the label on the ziploc! Otherwise, I'd never have identified that little frozen slab in the freezer.
Here's to instant umami!
Friday, November 12, 2010
Our Dirty Little Secret
There's a danger in learning to cook. It can breed picky children. There once was a day when I could crack open a can of soup, nuke it and call it dinner. Alas, the last time I tried that the response I got was "I don't like this. I like your soup better." The ultimate compliment. And yet, there are those Wednesday nights when you just don't have several hours to roast a chicken, make stock and serve up a steaming dish of homemade soup. But we have a secret.
Here's what we had for dinner Wednesday night:


Here's what we had for dinner Wednesday night:

Total cooking time: 30 minutes from start to serving.
Our secret?

Rotisserie chicken and stock-in-a-box.
Here's how we did it:
Saute 1 chopped onion in olive oil until it softens, about 6 minutes, stirring occasionally
Add to the onions:
2-3 carrots, peeled and chopped
2-3 carrots, peeled and chopped
2-3 ribs of celery, washed and chopped
12 oz of button mushrooms, cleaned and chopped into quarters.
Continue to cook another 5 minutes.
Add 1 box of stock and bring to a boil. Add a couple of handfuls of noodles (your choice) and cook in the soup according to the time on the pasta box.
While the soup is boiling, take the meat off the chicken bones (remove skin too) and chop into chunks.
Near the end of the noodle cooking time, add chicken to soup. Add salt and pepper to taste; a dash of vinegar also helps liven up the soup. You can stir in several cups of fresh spinach leaves at the last minute; they wilt instantly.
Not as good as homemade, but good enough for a week night. That's our secret.
Sunday, November 7, 2010
Tapioca with Cranberries
Tapioca Pudding.
For a long time those words made me think of two things: old British nursery stories and gelatinous snacks in my summer-camp lunch bag. So whatever possessed me to make some at home, I do not know, but I was possessed and we did and what a revelation.
Mostly milk, light on the sugar, and easy to make, it’s a great base for lots of flavors or savored on its own.

We just use the recipe on the box and I've found that stationing a kid-chef at the stove for the part that requires "stirring constantly" is a great way to include them in the dinner prep while I'm doing something else.
Since the pudding has to chill after cooking, we dish it out into small servings and stash those in the fridge while we eat. By the time the dishes are done, they're ready.
Cranberries are a great complement and our quick sauce is simple:
Combine in a non-reactive saucepan 1 bag of cranberries (washed and any soft ones discarded) with 1/2 cup water and 1/3 cup sugar. Stir occasionally and cook until the berries have popped, about 10 minutes. You can reduce the liquid further by continuing to cook a few minutes longer. Good seasonings include cinnamon, cardamon, orange or lemon.
A couple of spoonfulls of cranberry sauce livens up poultry or pork dishes as well as granola, yogurt and....tapioca!
Thursday, November 4, 2010
Falafel Chicken
Today was an uninspiring kind of day. Rainy and busy, I pulled out of the office parking lot late, two kids at home and a pitifully empty refrigerator. So I did what any normal person does when faced with a dinner emergency. I called one of my sisters.
"What's for dinner?"
"Your house or mine?" (we live several states apart)
"Mine. There's nothing in the pantry, and I've got about 20 minutes to shop, go!"
She thought for a moment then spoke these magical words: "Falafel Chicken!"
I took a few mental notes, dashed between the drizzles to pick up milk, chicken thighs and falafel mix and headed home.
My son tossed together some butternut squash chunks (worth buying pre-chunked!) while my daughter measured out and mixed up tabouleh salad.
I dipped the chicken thighs in egg, turned them over in the falafel mix and put them in a non-stick pan with some hot olive oil. About 5 or 6 minutes per side and they were done.

The chicken stayed very moist but the crust was flavorful and crunchy. We had a little cranberry sauce on the side and it provided a nice tart, bright note to the dinner.
Falafel chicken is something I never would have thought of, but it just skyrocketed to the top of my easy-weeknight-dinner list! Thanks Krissy!
Now if only we were close enough to share the dishes....
Saturday, October 30, 2010
Fish Tacos
Once in a while, I get a hankering for fish tacos. Thankfully, the most recent episode was on a Friday, so we had time to be relaxed after work and school. This dish doesn't take long to put together, but it did require a quick trip to the grocery store for fish, since I didn't have any on-hand.
The traditional fish taco is a little different than ours, but we improvised with a few extra ingredients (more veggies) and they were wonderful.
This kind of dinner is fun to enjoy with kids. You have to play with your food! The only cooking was done in one pan, and since I think it's best to serve the fish warm, but not necessarially hot-off-the-stove, it makes the whole dinner more relaxed.
As people drifted in and out of the kitchen, the tomatoes were sliced, the limes were sliced, the peppers were chopped and the zucchini was stirred. The fish was last into the pan, for just a few minutes, and when it was all spread on the table it looked like a party.

Friday Night Fish Tacos
3 small tomatoes, sliced
1 lime, quartered
lettuce, shredded
8 small flour tortillas
guacamole
0.5 lb fish per person - sea bass, cod or other white, firm-fleshed fish
options:
sliced zucchini, sauted with fish
shredded cabbage
salsa
sauted green/red peppers
Prepare and set out the tomatoes through guacamole. Saute any veggies in the pan that need to cook more than a few minutes.
I added a little olive oil and sauted the peppers and zucchini for about 8 minutes, stirring occasionally. Add the fish, lightly salted, to the hot pan. (you can remove the other veggies and put them aside in a serving dish if they're cooked though at this point, if not, they can cook with the fish). Cook the fish about 4 minutes each side for thick pieces, 3 for filets. When the fish is opaque and flakes easily, it's done. Put fish in the serving dish, break into chunks and serve.
We assemble ours by putting some guacamole on the tortilla, adding the fish and other ingredients and wrapping.

I suppose this approach would work with lots of other ingredients - chicken, tofu, scrambled eggs - time to play with our food!
In fact, playing with the ingredients on the table led to another wacky-flavor combination: apple slices and lime juice! I'm wondering if there's a new Fall pie in this one!
Tuesday, October 26, 2010
Oatmeal
Oatmeal has been with us for a long time.
When my son was about 2, he'd wake up in the morning and stand in his crib calling over and over "oat-oat da-da."
It was the first breakfast I taught him to make by himself. Thirty seconds at a time in the microwave.
One morning when I'd slept in until nearly seven (!) I heard the microwave going. And going. I dragged myself out of bed. In the kitchen, the table was set with a random assortment of bowls, plastic spoons, some with animal faces, and oatmeal.
"I made breakfast for everyone!"
This time of year, it seems natural to switch from granola back to oatmeal.
I often make it with milk, not water, but I was running low on milk the other morning so we did half milk, half water. The difference was pretty interesting. The oatmeal was creamy, but not as rich as before. More surprisingly, the flavor of the oats was much more pronounced. I gather that the milk has been overwhelming the oats until now.
We like ours with brown sugar, rasins optional.

It's a pretty simple thing for kids to make too:
Classic oatmeal, two large portions, three small portions.
Bring to a boil: 1 cup water + 3/4 cup milk
Add 1 cup old-fashioned oats (not quick oats!)
and a pinch of salt.
Turn down the heat and cook at medium-low for 5 minutes, stir frequently.
Serve with rasins, brown sugar, salt, milk, chopped nuts, cinnamon, maple syrup or whatever else strikes your fancy.
Friday, October 22, 2010
Hot-Dog!
When was the last time you had a hot dog?
For me, it was last week. At the North Carolina state fair.
I love food, and I love to cook. But sometimes, a hot dog is the right thing to eat. With chili sauce, thank you very much.


Along with the corn dog.
Yum-my.
For me, it was last week. At the North Carolina state fair.
I love food, and I love to cook. But sometimes, a hot dog is the right thing to eat. With chili sauce, thank you very much.

Some of my first solo cooking experiences involved hot dogs. Frozen ones, in a pack of twelve. My mom would call to say she was headed home and I'd take them out of the freezer, peel off the plastic, put the whole frozen lump in a pot of water (I can picture the exact brown enameled pot with a creamy-white interior), and wait for them to boil.
These days they're usually reserved for outings - like the fair, ball games and BBQs.

Along with the corn dog.
Yum-my.
Thursday, October 21, 2010
Shredded vs. Chopped
I've been out of town and eating way too much (good) food, so last night was a pseudo Monday and I wanted to do it right. We also had a class at 5:00 and needed to do it fast! Ah, the joys of the work-week.
I'd bought some easy salad ingredients to toss together, using some cooked pasta and some imitation crab as the protein. I don't know about you, but for a long time I thought of imitation crab as....well, disgusting. A friend re-introduced me to his rotini-crab salad and this is a twist on that dish (pardon the pun!).
I chopped a green pepper and put it in the bowl with some mung bean sprouts, cherry tomatoes, spinach leaves and the crab. When I put the noodles on to boil, I left my son in charge of shredding the carrots for the salad and I jumped in the shower.
I came back to the kitchen to find this on the cutting board:

Kid-chef? Nowhere to be seen. So I drained the noodles, threw together the salad and turned around. There he was, in his scout's uniform, which he'd suddenly remembered, mid-chopping, he wanted to show me.
You just can't be upset about that, you know?
I served up the salad,
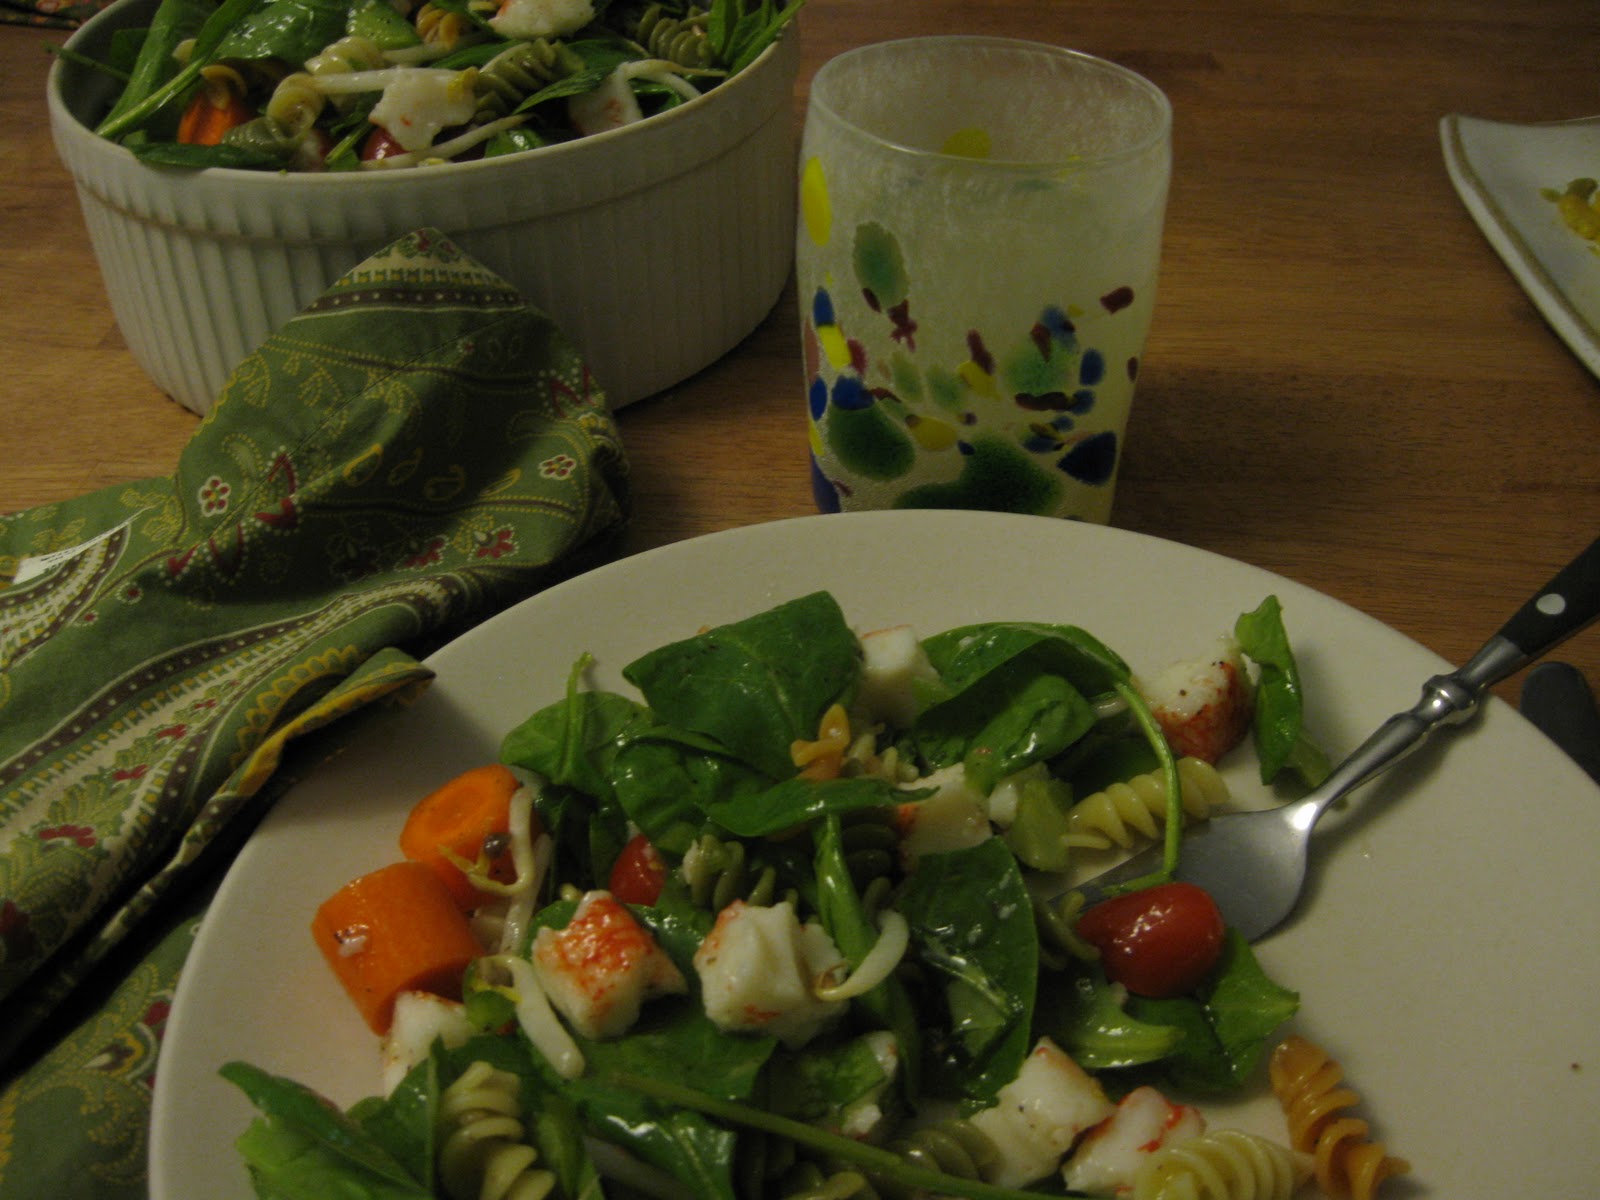
And it was good.

Here's what was in our Faux-Crab Salad:
1/2 green bell pepper, chopped small (so they don't see it....)
about a dozen cherry tomatoes, cut in half with kitchen scissors
1 package of imitation crab meat (made with fish and crab, good Omega 3s)
1/2 package of baby spinach
1/2 package of mung-bean sprouts
1/2 box of tri-colored rotini pasta, cooked al-dente
Vinagrette salad dressing to taste
2 medium carrots - shredded (with a veggie peeler). Or chopped.
Monday, October 11, 2010
Instant Lasagna
This easy weeknight interpretation of lasagna was a great use of a few leftovers. We'd made pizzas a few nights earlier, using about half a container of ricotta. Ricotta is one of those ingredients that tend to linger, half-used, in the seventh layer of refrigerator purgatory until they turn green or qualify for a science fair. Trying to avoid that waste, I was on a mission for a quick-use solution.
We layered some spinach leaves in the bottom of the dish. Spooned the ricotta in, added hot noodles and half a jar of spaghetti sauce, usually found doing penance next to the ricotta.

Toss, and serve.

A little ground pepper really rounded out the flavors of this one. See our new page, Who Knew? Wacky Combinations for more about that!
Sunday, October 10, 2010
Creme Brulee
With some obsessions, you know exactly when they began. The first time. The initial discovery. With others, the beginnnig is less dramatic, it builds up over time until there's no more ignoring it. Creme brulee is like that for me. I don't remember the first time I had it and it probably wasn't any good. But somewhere along the line, I had a few good ones and that combination of silky custard and crackly crust took hold.
Until now, I've reserved that pleasure for restaurants. After all, who keeps a kitchen blow-torch at home? Right? It turns out, one of my best friends does. And when she mentioned in an offhand way that they were easy to use, my curiosity was piqued.
Then I got one as a birthday gift.
You know what comes next, right?


Then it was time for the heat! I was pretty hesitant at first, and the button was hard to hold in, which makes it less appealing to the kid-chefs who were just *dying* to try! But once we got the hang of it, the sugar toasted up quickly and lovely it was.

There are few sounds more satisfying than cracking through that sugar crust with your spoon. Stepping on top-side frozen puddles in the winter, dropping a sheet of ice on the ground and hearing it splinter, cracking a creme brulee. Ahhh.
As one kid-chef noted, the flavor is similar to that of palmiers, but the creamy texture of the custard was fantastic. I wouldn't hesitate to make these for a dinner party because the custards can be made in advance and crusted just before serving.
Thanks for the inspiration, Ali. Thanks for the torch, Neil.
Here's hoping you get a homemade creme brulee soon chez vous!
Until now, I've reserved that pleasure for restaurants. After all, who keeps a kitchen blow-torch at home? Right? It turns out, one of my best friends does. And when she mentioned in an offhand way that they were easy to use, my curiosity was piqued.
Then I got one as a birthday gift.
You know what comes next, right?

The custards were easy enough to make, basically some egg and yolks, sugar and cream with a splash of vanilla and grand marinier. They baked in the oven for about 40 minutes while we made and ate dinner. Sugar sprinkled on top,

Then it was time for the heat! I was pretty hesitant at first, and the button was hard to hold in, which makes it less appealing to the kid-chefs who were just *dying* to try! But once we got the hang of it, the sugar toasted up quickly and lovely it was.

There are few sounds more satisfying than cracking through that sugar crust with your spoon. Stepping on top-side frozen puddles in the winter, dropping a sheet of ice on the ground and hearing it splinter, cracking a creme brulee. Ahhh.
As one kid-chef noted, the flavor is similar to that of palmiers, but the creamy texture of the custard was fantastic. I wouldn't hesitate to make these for a dinner party because the custards can be made in advance and crusted just before serving.
Thanks for the inspiration, Ali. Thanks for the torch, Neil.
Here's hoping you get a homemade creme brulee soon chez vous!
Subscribe to:
Posts (Atom)